IoT Gate Opener with the Ganimede.E12 Board
With the Ganimede.E12 board, we manage the opening and closing of a gate, or other electronic devices, using a dedicated smartphone application.
The problem with DIY IoT devices
Nowadays, attention to home automation and IoT (Internet of Things) devices is so widespread that we often look for appliances or other electrical devices with software that lets us manage them better. However, controlling an air conditioner or blinds remotely often costs more than purely mechanical devices, not to mention that to control them from our phones we would have to replace them with more modern equipment, even though our old ones still work perfectly well.
In addition, an aspect that those less familiar with the subject do not consider is cybersecurity. It is true that it is not necessary to implement security measures similar to those of a bank or a car to manage simple appliances, but it is also true that many people have no problem buying a camera that allows live streaming from their phone, without worrying that those images pass through servers located on the other side of the world, where GDPR (the European privacy protection regulation) is not always respected to the letter. The more experienced will opt for homemade solutions, such as using their own server or a cloud service, but all this has a cost.
The project: Ganimede.E12 and a dedicated app
In this article, we propose to build a device suitable for controlling the opening and closing of a gate remotely, consisting of the Ganimede.E12 board (already presented in a previous post) and a specially developed mobile application. Given the versatility of the project (a relay is used for load control), it will be possible to extend its use to other applications, such as controlling domestic boilers or heaters.
The mobile application does not collect any personal data, and does not transmit any privacy-relevant information to any server, as can easily be verified with software that analyzes the data traffic of your phone. Finally, communication between the app and the gate opener occurs through the free cloud service offered by dweet.io, in a totally secure manner.
System block diagram
In Fig. 1, the system block diagram is shown. What immediately stands out is the type of architecture: serverless, that is, without any server, neither domestic nor provided as a service by a provider.
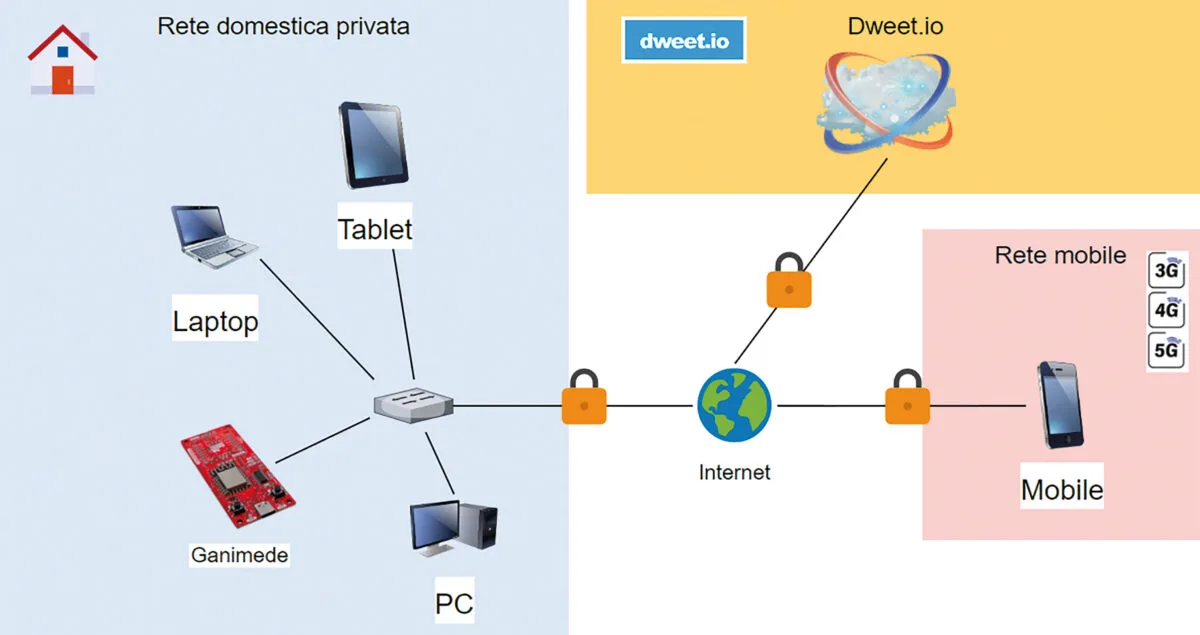
Communication is direct, between the gate opener device connected to the home WiFi network and the mobile application, through the cloud service provided by dweet.io, which allows messages to be exchanged securely and efficiently. An advantage both economic and environmental, since there are no servers and network devices to manage.
Hardware
As we anticipated, for the HW implementation we use the Ganimede.E12 board, equipped with an ESP-12F microcontroller and the expansion slots needed to connect additional hardware. In particular, we will connect the 5 Vdc 10 A relay to the Neopixel connector (CN4), so as to control it using a PIN for managing a digital output, and the miniature 0.96” OLED Display connected via I2C to the CN7 connector on the board. The hardware architecture, shown in Fig 2, is very simple and will allow developing firmware that is equally straightforward and readable.

Protocol
dweet.io has been mentioned several times as a service provider, but before going into the details of the software architecture used, it is necessary to understand how this provider works.
The name itself recalls a famous social network and microblogging platform, and it is precisely from the well-known Twitter that it takes inspiration. Here, however, it is not people exchanging messages, but IoT devices. Once a name is defined for your device, the so-called endpoint, anyone can write and read messages related to that endpoint, as if one or more users were tweeting about a specific topic using a hashtag. Many other services allow IoT device communication, but the two factors that make dweet.io particularly attractive are the protocol used and the free nature of the service.
The typical embedded world protocols are not used to communicate (or “dweet”), but rather web APIs, in particular simple HAPI (Humanized Application Programming Interface).
The idea behind HAPI is to create a standard for interfaces so that they are self-documenting, and therefore easy to interpret, both by the machines that use them, but especially by developers. The main pillars of HAPI are in fact:
- accessibility through a URL, even with a simple web browser;
- ease of reading input and output in the form of normal sentences;
- ease of reading, so that it is understandable even to non-technical people.
HAPI uses the HTTP application protocol, which we use daily to browse any website, but simplifies its use, since only two of the different available methods are used: GET and POST. The first to read information, or dweet, the second to create it. With HAPI, URLs are also standardized, so requests and responses are easily interpretable for any type of communication. The idea of limiting URL customization by the API designer stems from the need to simplify CRUD (Create, Read, Update, Delete) operations for data management, without the need to repeatedly consult documentation.
By defining a name for our device, for example “EInApricancello”, the GET method that will allow us to read the latest dweet will be called from the following URL:
https://dweet.io/get/latest/dweet/for/EInApricancello. Similarly, it will be possible to create a dweet with a POST request to the following URL, inserting a JSON in the body of the request itself:
https://dweet.io/dweet/for/EInApricancello. Finally, it is useful to take a look at the complete content of a request, that is, the JSON, which is sent when we post a dweet. Assuming the request body is a test string, the complete dweet will be:
{
“this”: “succeeded”,
“by”: “getting”,
“the”: “dweets”,
“with”: [
{
“thing”: “EInApricancello”,
“created”: “2023-05-15T18:41:17.166Z”,
“content”: {
“test”: “stringa di test!”
}
}
]
}
Analyzing the dweet JSON in detail, it is possible to notice how reading is immediate thanks to the HAPI structure. The object fields are created and populated automatically by the dweet.io service, which, in addition to the default values, inserts the endpoint name, the timestamp, and the content of our request in the “content” field.
We have focused on the ease of use of the provider and highlighted the free nature of the service. But precisely this last factor implies restrictions that can be overcome by using the paid version of the provider. The main limitations of the free version are the time limit on requests (it is not possible to ‘dweet’ with a frequency greater than 1 Hz) and no authentication and encryption methods are provided. The fact of not being able to send more than one request per second could be a problem for strict real-time applications, that is, those that need to exchange signals with very high frequencies and response times below one millisecond. For IoT applications, and in particular for a gate opener, such a requirement is not necessary.
Obviously, this could be a limitation for embedded systems where safety measures are essential, such as the ECUs used in the automotive world. The lack of authentication, which would let us know who is interacting with the device, and the lack of encryption to hide the details of the messages sent, could instead be a problem. The free version of dweet.io not only lacks these features, but at the following link https://dweet.io/see you can see the messages exchanged by devices all over the world. This could be a problem for home automation devices, because anyone could, for example, open our home gate, or see the information exchanged by our devices. The simplest solution to the problem would be to purchase the paid version of the service, but the most interesting one is to implement a system to encrypt the content of our dweets so that no one else can interact with our board, for example by opening the gate in our place.
Cybersecurity
To protect the communication between the board and the mobile application from malicious actors, it is necessary to implement a mechanism capable of encrypting the messages. As illustrated in the previous paragraph, we can ‘dweet’ a message, which is nothing more than a JSON containing the data we want to send. The body of this message ends up in the content field of the dweet, while all other parameters are automatically set by the provider with metadata. To make our signals secure, we therefore need to encrypt the content field, while we can ignore the fact that the metadata is sent in clear.
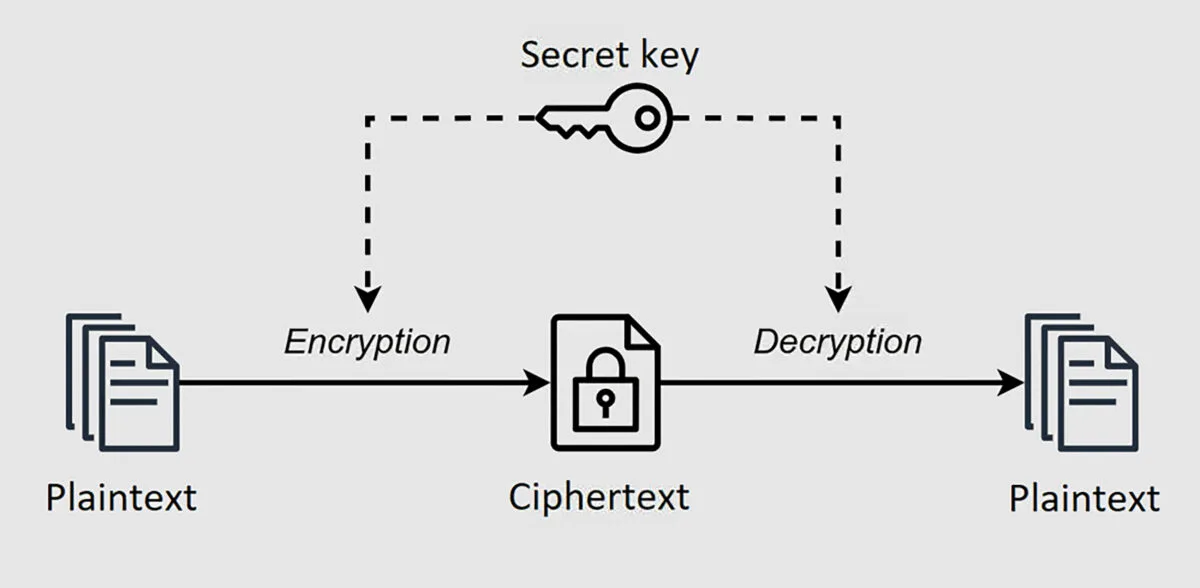
The first step is to choose a type of algorithm that suits our needs. For the application, we thought of using a symmetric key algorithm, that is, one capable of encrypting and decrypting a message using the same key. This technique is very widespread and fairly simple, but it also has some disadvantages. For example, both ends involved in the communication must have the same key, and often the key exchange itself represents the crucial node of the entire communication.
It can therefore be deduced that both the board and the mobile application should have a key in memory necessary for the encryption algorithm to work. The idea is to have the user set the key (essentially a password) within the application on their phone, and on the first boot of the board, transmit it to the device, along with a series of data: the name of the dweet endpoint, the name of the Wi-Fi network the board will connect to, and the password of that network.
Once we have thought about how the key can be used by our two communication points, we can move on to the description of a generic symmetric key algorithm: given a message P (PlainText) and a key k (a password), the sender, using a symmetric encryption algorithm S, will obtain a new message C (Ciphertext): S (P, k) = C. The recipient, having obtained the encrypted message C, using the same key k and a decryption algorithm D, will obtain the initial plaintext message P: D (C, k) = P. In our case, the app will always act as the sender and encrypt the message, while the embedded device will have to decrypt it.
There are many implementations of similar algorithms, but for this application we have chosen the Advanced Encryption Standard (AES, also known as Rijndael). AES is one of the most famous symmetric key algorithms, used worldwide for its security specifications, even as a standard by the US government. We will not go into the technical and mathematical details of the algorithm because, thanks to its fame, there are now many libraries that offer robust, easy-to-use implementations in various programming languages. Once our algorithm is implemented, our dweets will have the content field encrypted:
{
“this”: “succeeded”,
“by”: “getting”,
“the”: “dweets”,
“with”: [
{
“thing”: “EInApricancello”,
“created”: “2023-05-15T18:41:17.166Z”,
“content”: {
“ciphertext”: “lkdjf98sdaflkj4lkajsdf!asdlkfj9”
}
}
]
}
The string contained within the ciphertext, seemingly incomprehensible, once decrypted by our board will contain the original message, for example the command to open the gate. Remember that no one without the password will be able to decrypt the message, but the ciphertext will always be visible to everyone on dweet.io. This could expose our system to a replay attack: if our ciphertext contains the equivalent of an “Open the gate” message, a potential malicious actor could intercept the message and send it again at a later time, succeeding in their intent.
This could be solved by adding an authentication layer, but there is a much simpler alternative to overcome the problem. It is sufficient to insert the timestamp of the mobile application into the content of our message. This way, the board can decrypt the message containing the timestamp, compare it with its own, and if the difference is greater than one second, it can discard the message. In this way, a replay attack would not work, because even if a message were intercepted and retransmitted at a later time, the ciphertext would contain a timestamp so old that it would always be ignored by the device (note also that the timestamp is itself encrypted, so it would not be possible to alter it to make it appear recent).
Software architecture
As we anticipated in the introduction, we will use the Ganimede.E12 board as the HW platform for this project. As already widely reported, one of the major advantages of Ganimede is the possibility of programming it using MicroPython. The use of this famous interpreted language in the embedded world, and in particular for home automation devices that do not need extremely high performance, allows us to create a clean, simple software architecture with very short implementation times.
Before diving into the code and diagrams, we must specify that for this article we decided to use object-oriented programming (OOP) as the programming paradigm. It could be considered an unusual choice, but probably a convenient one in this case. Procedural programming is often preferred in embedded devices because low-level languages, like C, are the most used choice for controlling memory byte by byte and thus optimizing performance. They are fast, give the programmer the highest possible degree of freedom, but they are also complicated and prone to errors. And of course, they do not provide for the use of classes and objects.
This is why frameworks, guidelines, architectures, and implementation styles have been created over the years to achieve that flexibility native to object-oriented programming languages, which is difficult to reproduce in low-level languages. Python will not give us the ability to control every single byte we are allocating, but for an IoT device it is not really necessary either. For our specific case, the use of OOP combined with such a flexible and powerful language will allow us to write simple, readable, clean code and to respect the SOLID principles (Single responsibility, Open-closed, Liskov substitution, Interface segregation, Dependency inversion), which allow for a scalable and maintainable implementation.
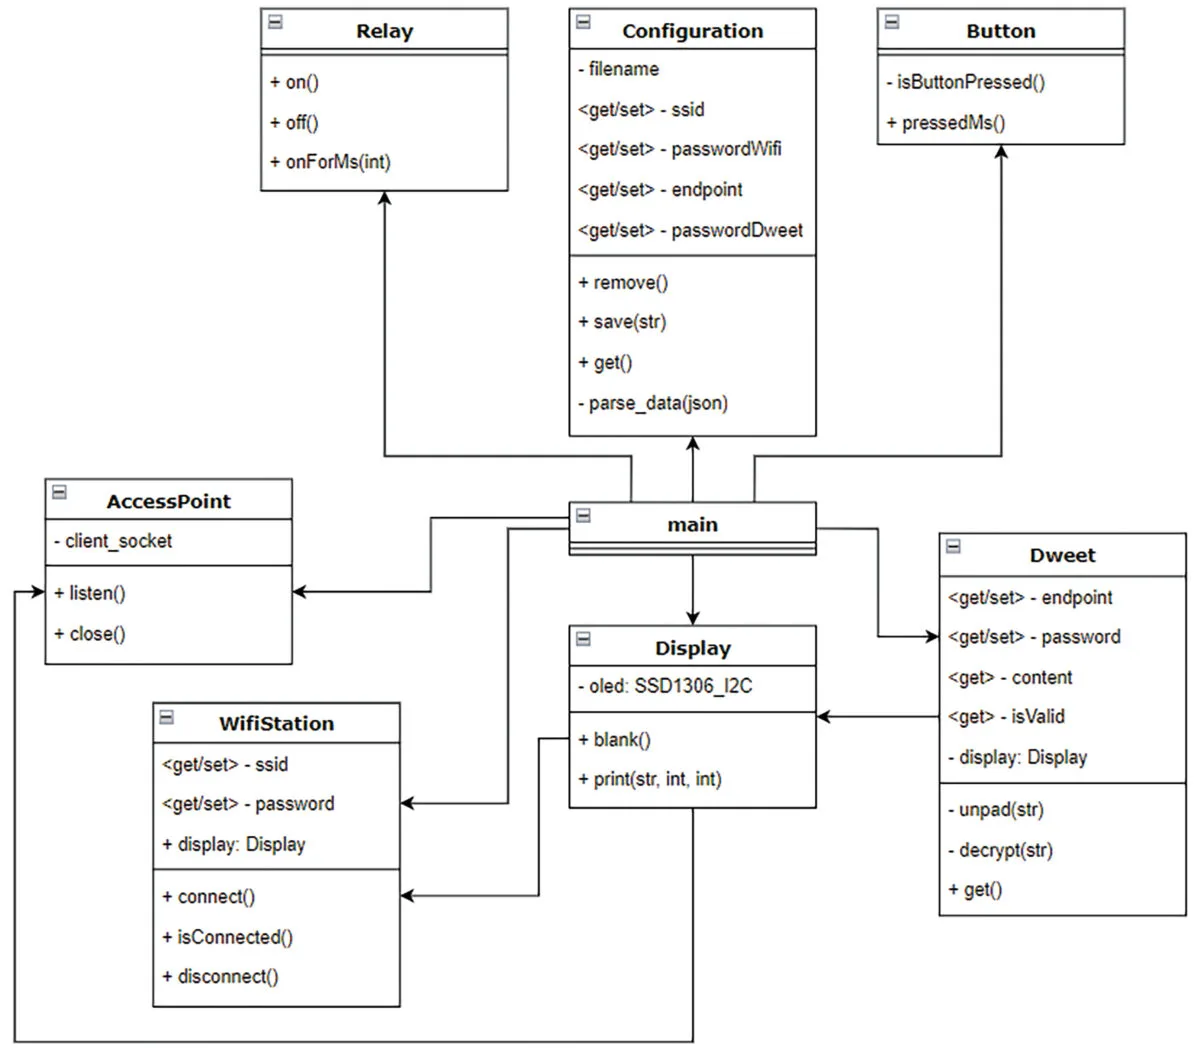
Remember that a class is nothing more than a model, a sort of description of a part of our program. The class contains attributes, that is, variables, and methods, that is, functions. When a class is instantiated, we have created an object. The classes that make up the software are:
- AccessPoint: for the implementation of the Ad-Hoc Wi-Fi network used to configure the board on first boot or after a reset;
- WifiStation: which manages the connection to your home Wi-Fi network;
- Configuration: with a wrapper of methods to simplify saving the configurations settable via the app in NvM, so that they are also available when we perform a hard reset (e.g., power off and on);
- Dweet: which simply polls for messages on dweet.io, decrypts them, and parses the requests.
Finally, there are three classes that we can define as hardware dependent, since their implementation is strictly related to the hardware and connections of Ganimede:
- Display: which specifies the pins and methods for interacting with the OLED display, useful for printing device status messages;
Button: handles the user button press, managing the reset functionality after a long press;
Relay: activates and deactivates the relay connected to the neopixel connector.
Figure 4 shows a simplified UML class diagram, with the public and private methods of our implementation, as well as the attributes with any getters and setters.
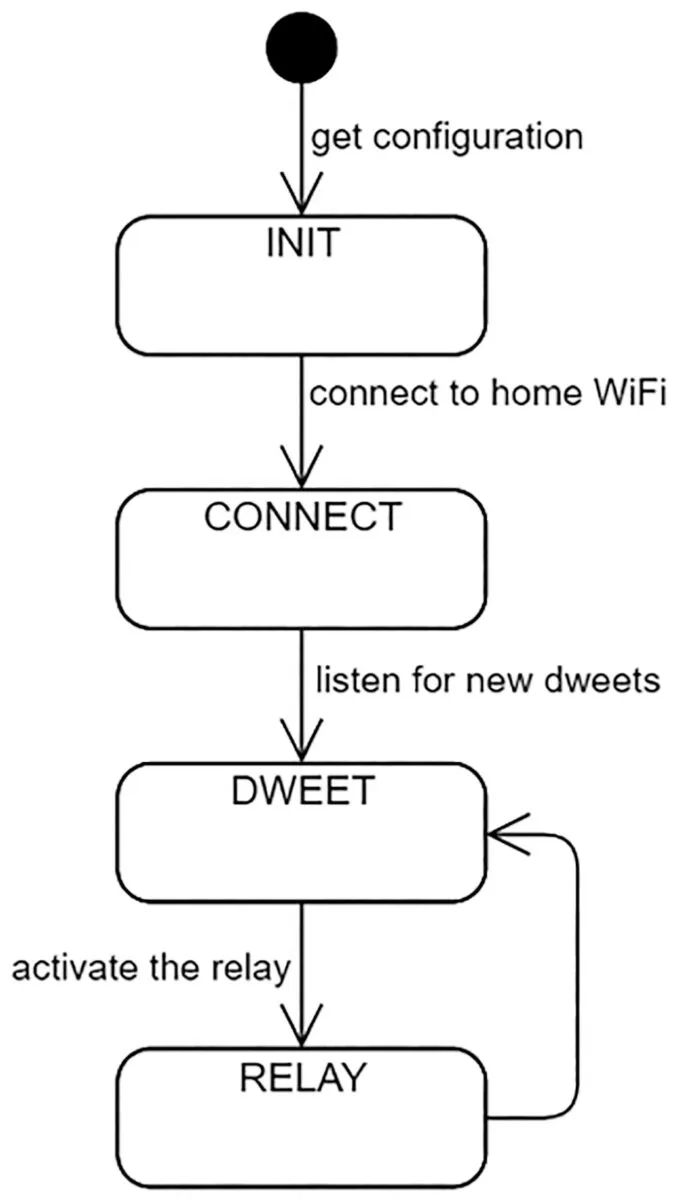
MicroPython automatically runs the main.py file at board startup, so we chose it as the entry point of our software, the best place to instantiate our classes and implement the state machine of our gate opener. Main.py contains a single function that runs the state machine shown in Figure 5 in an infinite loop.
The INIT state checks whether a configuration is present in memory, as shown in Figure 6.
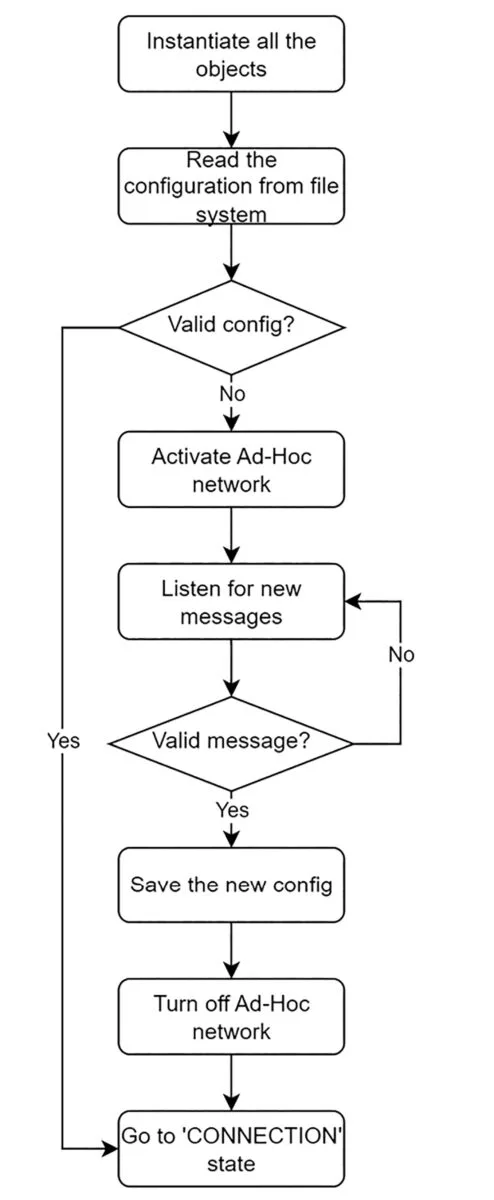
If there is no configuration, Ganimede activates the Ad-Hoc WiFi network to receive one; otherwise, it moves to the CONNECT state. In this phase, the device tries to connect to our WiFi network. Once the connection is established, the FSM (Finite State Machine) transitions to the DWEET state, as shown in Figure 7.
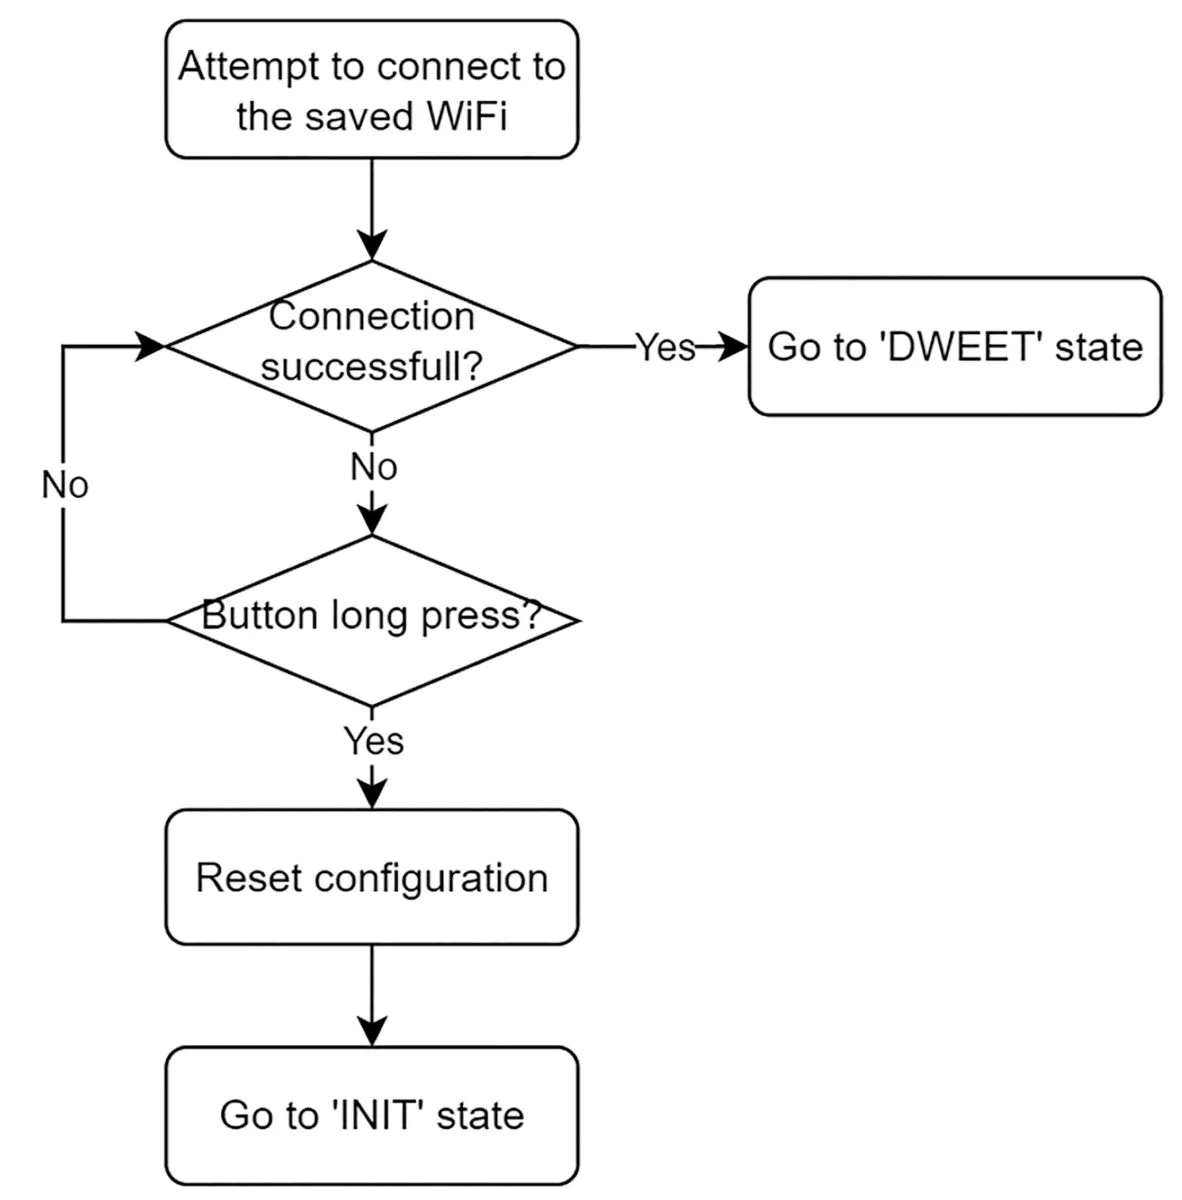
If the connection drops, for example because we want to restart the home router, the board will automatically reconnect as soon as the signal becomes available again. The DWEET state is where our software spends almost all of its execution time, because it is in these few lines of code, particularly with the dweet.get() function, that we check whether we have received a new command. Whenever a new valid message is received, the FSM moves to RELAY, but only for the time needed to activate the relay. The flow diagram of the DWEET state is shown in Figure 8, while the RELAY state is in Figure 9.
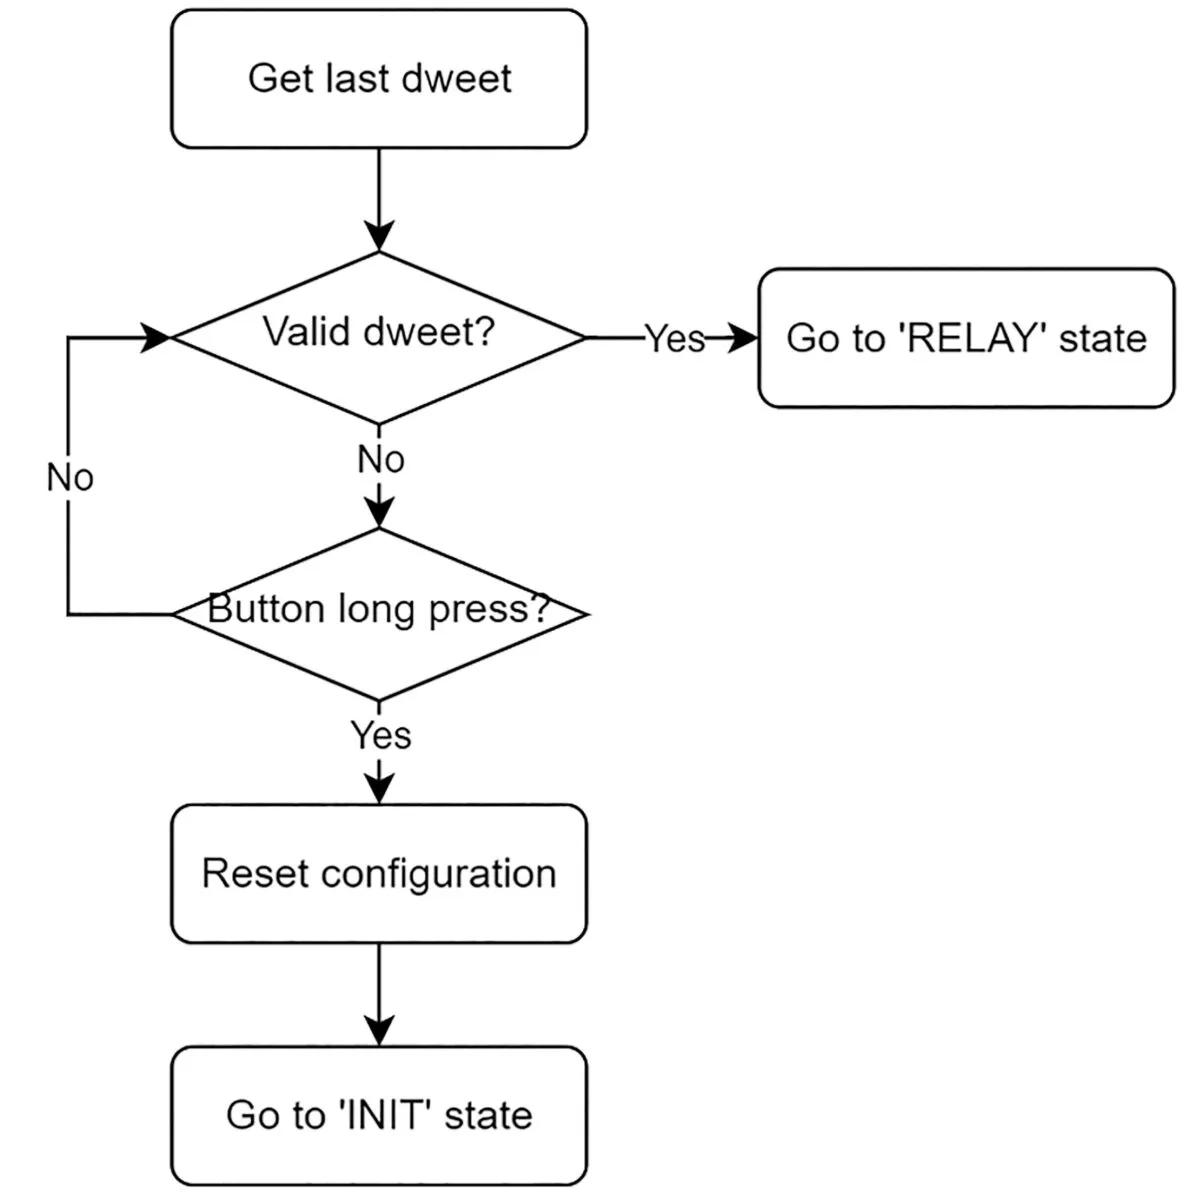
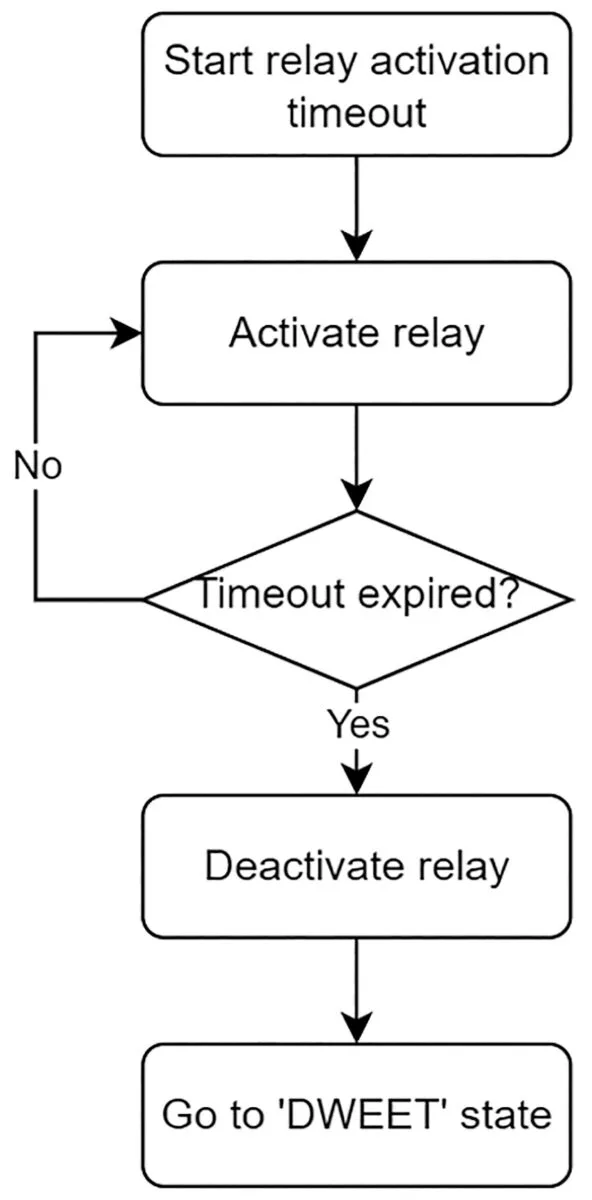
Note that the FSM is equipped with the necessary code (Listing 1) to read the button press and possibly perform a reset.
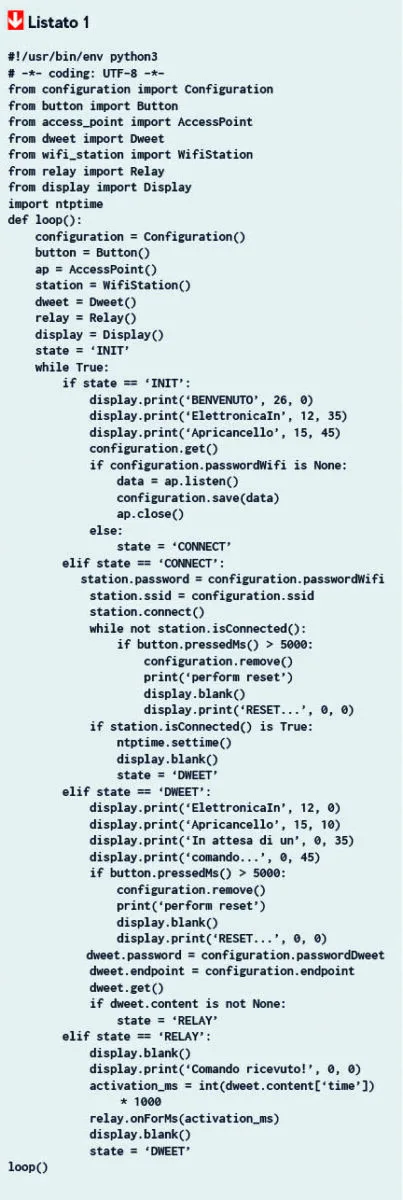
In addition, the software includes a series of debug messages (sent to the MicroPython console) and user messages (displayed on the OLED display) to provide the end user with more details about the device status. The AccessPoint class, shown in Listing 2, is extremely simple since it consists of only two methods: listen and close.
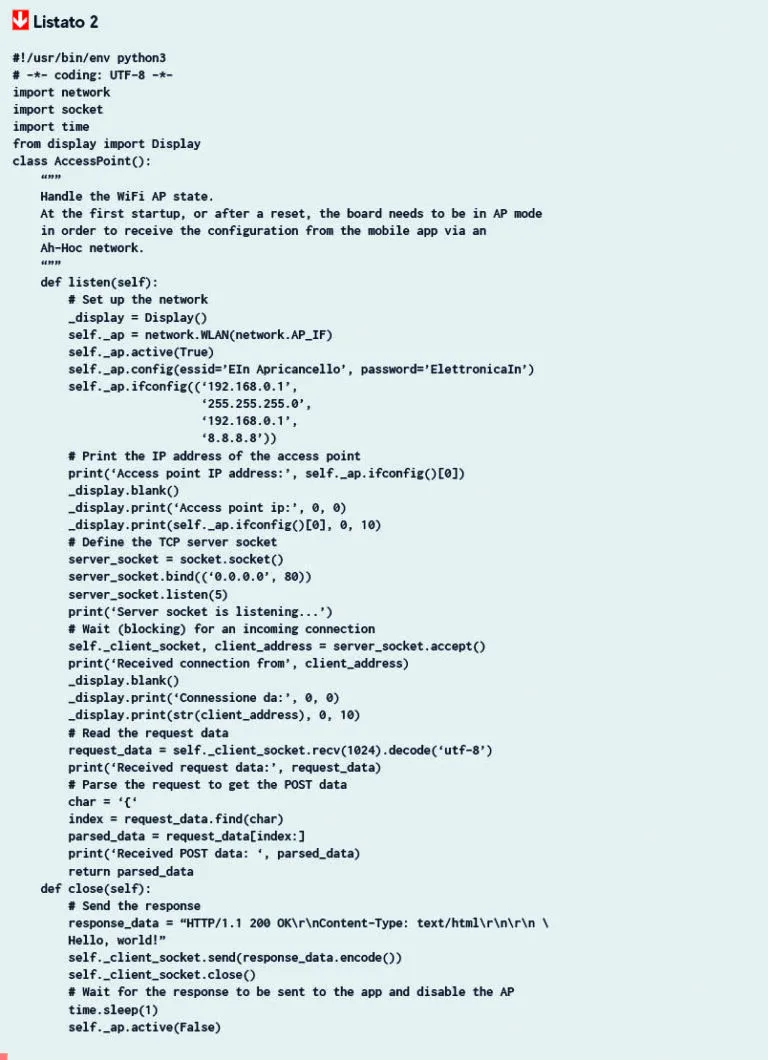
Thanks to the modules already included in MicroPython, implementing this functionality is possible with a handful of lines of code, unlike the hundreds needed if the chosen language were, for example, C. The idea is to create a WiFi network with a predefined and unchangeable SSID (the network name) and password, since the interaction between the app and the Ad-Hoc network occurs only during the one-time configuration phase, and the network availability ends once the settings are saved.
For the same reason, the data exchanged in this phase will use the HTTP protocol (without the ‘S’). The protocol is insecure by definition, but implementing sophisticated security measures that involve managing keys and certificates does not seem suitable in this case. Making the communication between the app and the board particularly secure, which happens only once in the product’s life cycle and can last no more than a couple of minutes, would not justify the overhead in terms of performance (saving and retrieving keys and certificates from memory) and development time.
The method in question, as the name suggests, simply activates the WiFi network and listens for a new message. Once the message is received, it is saved in non-volatile memory and the close method is invoked. The latter simply stops the created network, so that no client can connect to it, for example to send other malicious messages.
We have mentioned saving to non-volatile memory several times. Those with experience in firmware writing know that it is often a pain point. Having a software stack that provides interfaces to application software writers is essential in a medium/large project, otherwise developers will spend their time not writing code, but analyzing flash memory addresses and checking all the possible exceptions that can arise with their data.
Ganimede not only helps us, but goes much further. We can save our data in simple text files, using the normal Python library functions, and access them as if we were reading the file system of our PC. More than just helping us, MicroPython brings a real revolution in this regard, allowing us to focus on the application logic and forget about addresses, sizes, and various alignments. The Configuration class (Listing 3) therefore simply provides methods for the most common write, read, and delete operations needed to save our parameters.
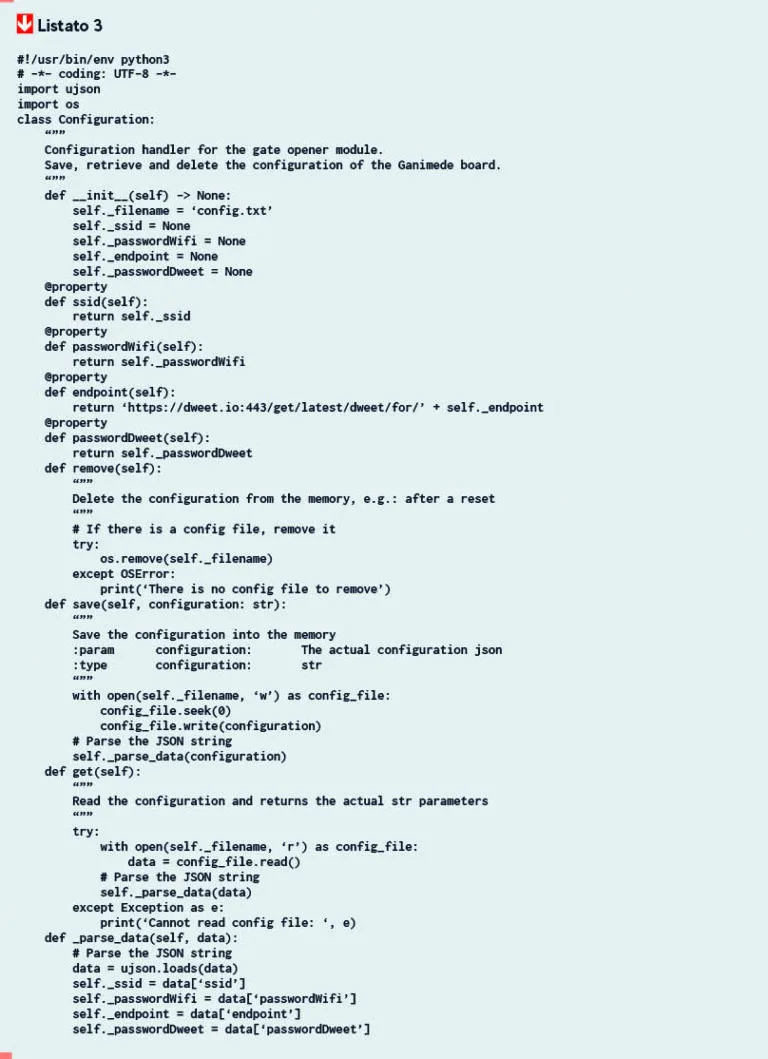
The private method parse_data is used to read the JSON coming from the mobile app. The JSON format was chosen for data exchange because it is the most widespread when dealing with web APIs, it is immediate to read and simple to manage, since Python has library functions for handling the format.
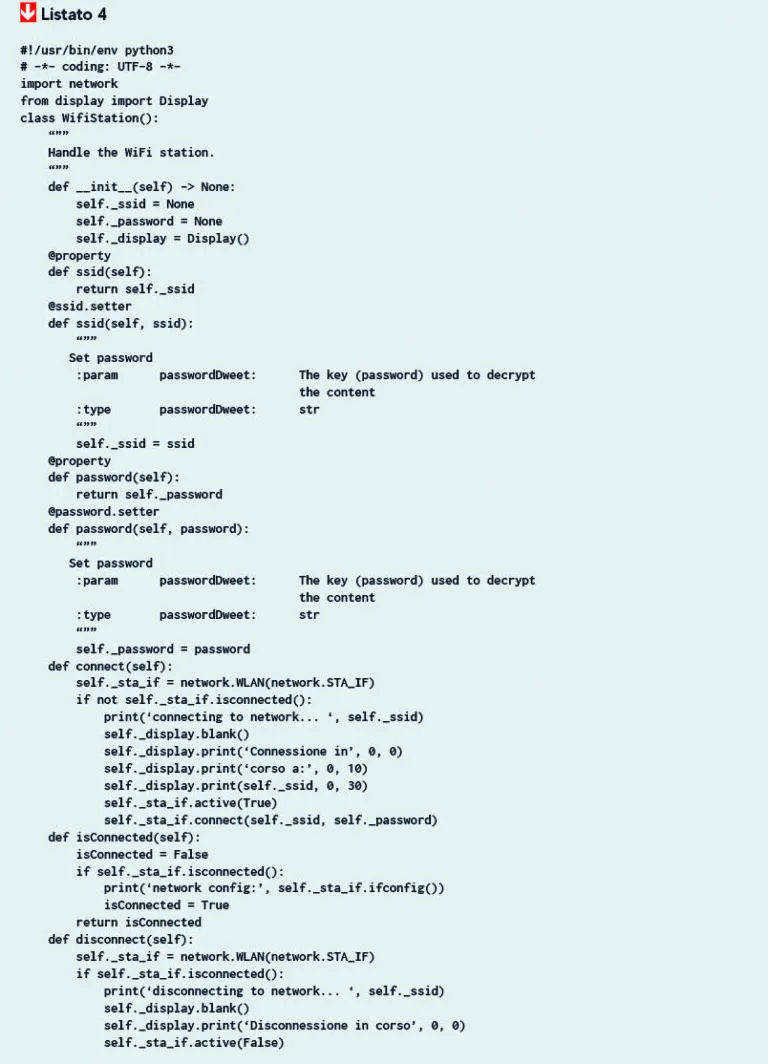
The methods contained in this class simply read the content of a text file named configuration.txt, write the file content, and possibly delete it, for example after a reset. Another important software component of our system is the WifiStation class.
Connecting to a WiFi network is now a procedure integrated into the standard libraries of many programming languages. Python is no exception; just provide the SSID (the network name) and the password, which we take from the previously saved configuration, to the APIs provided by the library, and thanks to the imported network module, it will be possible to connect. Of course, to move to the next FSM state, we must ensure we are connected to the network, hence the exposure of the isConnected method that performs this check. Most of the application logic is handled inside the Dweet class (Listing 5).
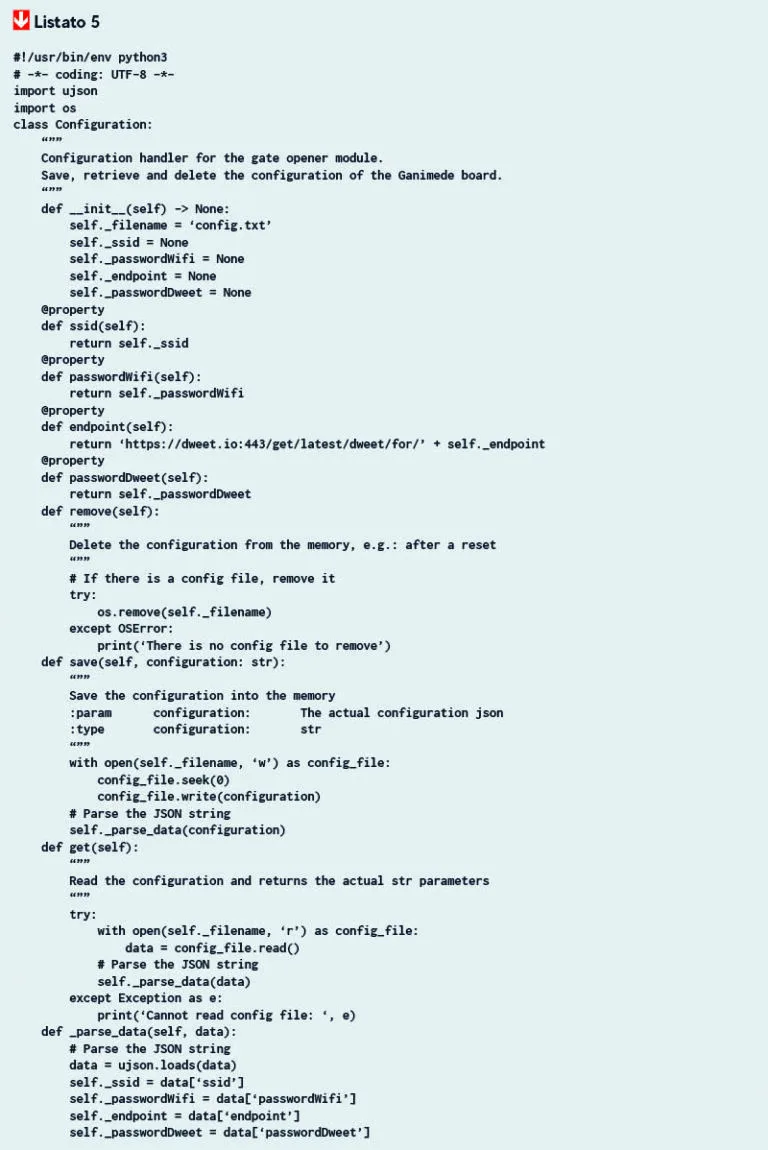
By importing the request module, we have access to a series of functions that can poll the GET method of the HTTP protocol with the API defined by dweet.io. The method is called cyclically waiting for a new command. When the service sends a valid response, the board must process the request. The first step is to decrypt the data. The private method decrypt takes the encrypted message (ciphertext) and the password contained in the config.txt file as input, and using Python’s cryptolib, calls the necessary library functions to decipher the message using the AES explained earlier.
In the cybersecurity section, we mentioned how the validity of the message, to avoid a replay attack, is implemented not through authentication, but by comparing the board’s timestamp with the one sent by the mobile application. If the difference is sufficiently low, the message is considered valid. In addition to the simple logic that compares the time instants, functions have been added to convert the timestamps so that they can be easily compared.
It is well known that timestamps usually mean the seconds, or in some cases milliseconds, elapsed since January 1, 1970 UTC. This is the value sent by the app, while the timestamp returned by the board’s RTC (Real Time Clock) component returns the seconds since January 1, 2000. The so-called epochs are different, so a conversion is necessary. The more attentive reader will notice that, while the application on the phone will always send a valid time due to the almost permanent presence of an internet connection, the embedded device needs precise instructions to perform this sync. The following line of code contained in main.py allows time synchronization through the NTP (Network Time Protocol) protocol:
ntptime.settime()
The classes described so far interact with the hardware, particularly with the internal components of the System-on-Chip, namely the ESP12F. Let us now move on to the interactions with the external hardware, i.e., the relay, the display, and the user button present on the Ganimede. The Button class, shown in Listing 6, contains an initialization function that specifies the button pins, a private method that detects whether the button has been pressed, and a public method that returns the number of milliseconds the user held it down.
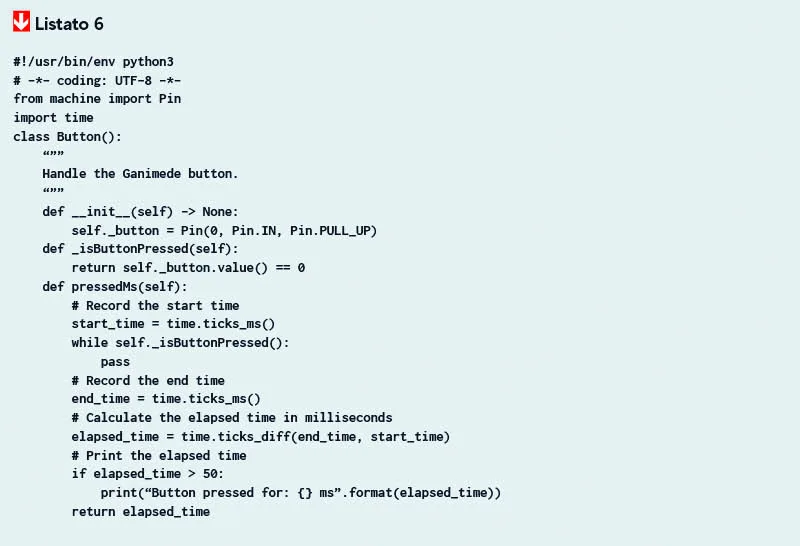
This feature is useful for performing a reset only after a fairly long press, for example 5 seconds.
Relay.py, described by the code in Listing 7, has a similar init function, a method to activate the relay, one to deactivate it, and a third to close the contact for a certain number of milliseconds.
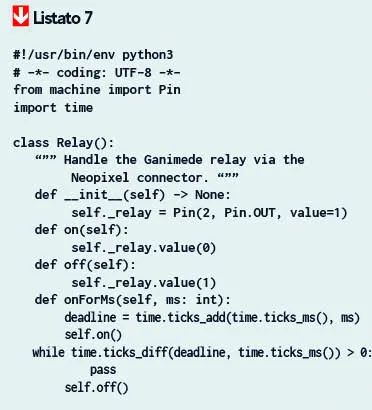
The latter is particularly useful in the case of activating a gate motor, because we want it to activate for a certain number of seconds needed for opening, if our relay physically drives a motor. If only a pulse is sufficient, we can still reduce this activation as desired (for example, setting 1 or 2 seconds of activation). In Display.py, Listing 8, we finally have the functions that allow printing text on the 0.96” OLED display.
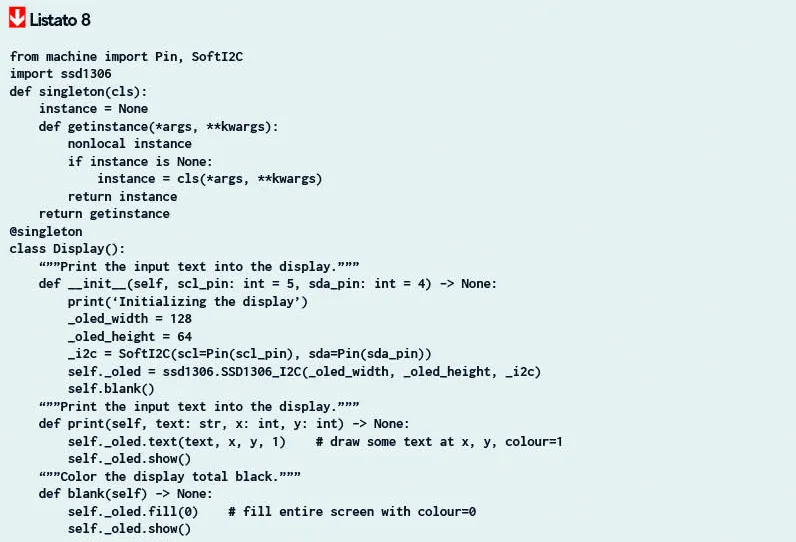
The ssd1306 module already contains all the necessary functions, so the class simply acts as a wrapper to adapt them better to our use case. In this file, however, unlike the previous ones, we used the singleton pattern implementation, creating the appropriate decorator. This way, every time a new object is attempted, a check is performed: if an instance of the class already exists, the reference is returned, otherwise it is created.
The reason for this choice comes from the fact that while Button and Relay are instantiated and used within main.py, Display is used within all classes, since printing a status message can be done by any component. Since we don’t want the init function to be called every time, because it is always the same, and we don’t want multiple allocations of variables containing the same value, we decided to use this paradigm.
App architecture
As repeatedly announced, the ease of use of the entire project is also given by the mobile application that allows easy interaction with the hardware. The application was created with a particular focus on ease of use and performance in terms of execution speed, with graphics based on a Material Design interface, and the possibility of having a cross-platform product, Android and iOS. In Fig. 10 you can see an image of the interface.
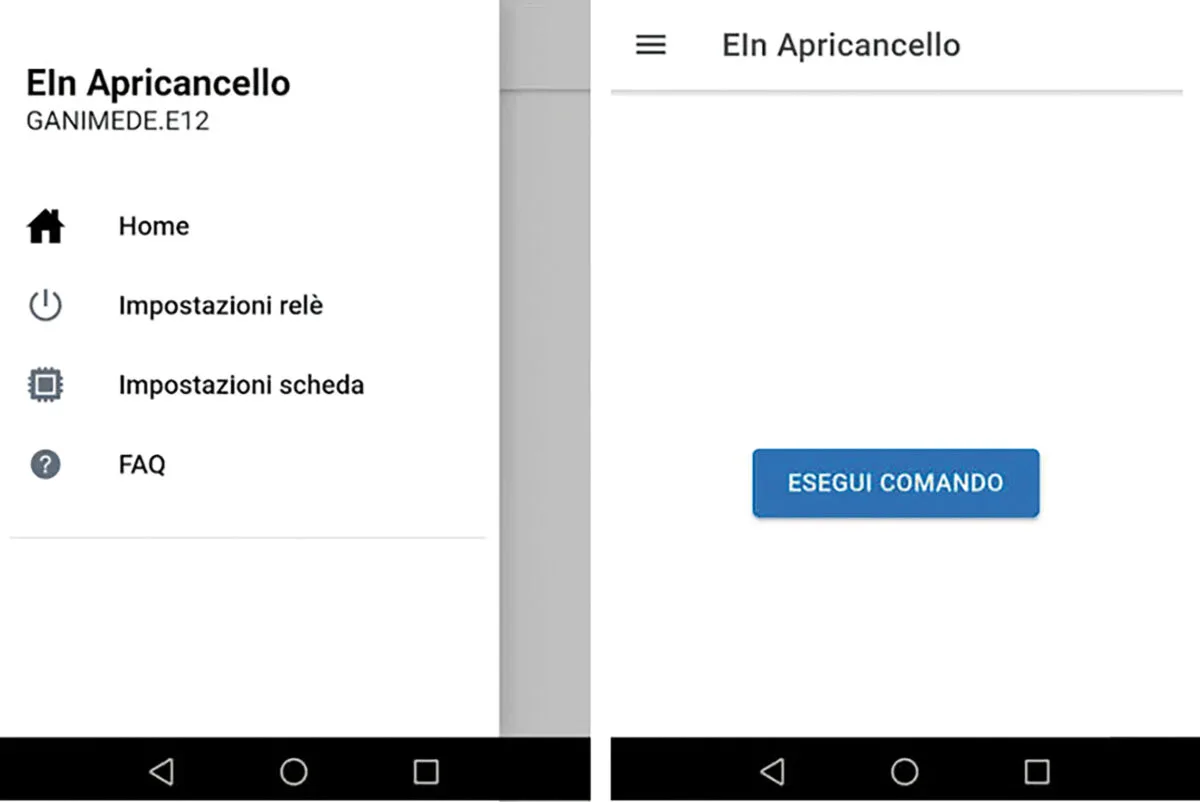
The application is self-explanatory and very intuitive: from a side menu you can select the main screen to send a command to the board, a screen with settings related to dweet.io configuration, and another with the SSID and password of your WiFi network. For more information regarding settings and the device in general, there is a dedicated FAQ screen with the most frequent questions.
The application is ready to be used by the end user, but for the more curious we want to provide more details regarding the implementation. For the realization, we chose to use the Ionic framework. This way you can create an application for Android and iOS starting from the same code. The framework offers the possibility to develop using the JavaScript language associated with a front-end framework, in our case React. This way, development time is significantly reduced, and at the same time it is possible to use well-known React libraries, such as Material UI for developing a modern and attractive graphical interface, quite simple in our case. To conclude, we emphasize once again how the command sent from the application is nothing more than an encrypted HTTP POST request to dweet.io, so there is no intermediary and our privacy is well protected.
Variants
The described project uses the following hardware external to the board: a relay and a 0.96” OLED display. Remember that thanks to the modular implementation described in the previous paragraph, to replace one of the components you only need to replace the corresponding class. To use another display, just modify Display.py, or simply remove the function calls if we don’t want any screen. By changing the Relay.py file we could use different hardware, such as a click-relay module or a groove-relay, using the connectors present on Ganimede. Potentially we could also use another button instead of the one integrated on the board, all thanks to the versatility and the numerous buses and connectors present on Ganimede and already described in issue 272.
Case
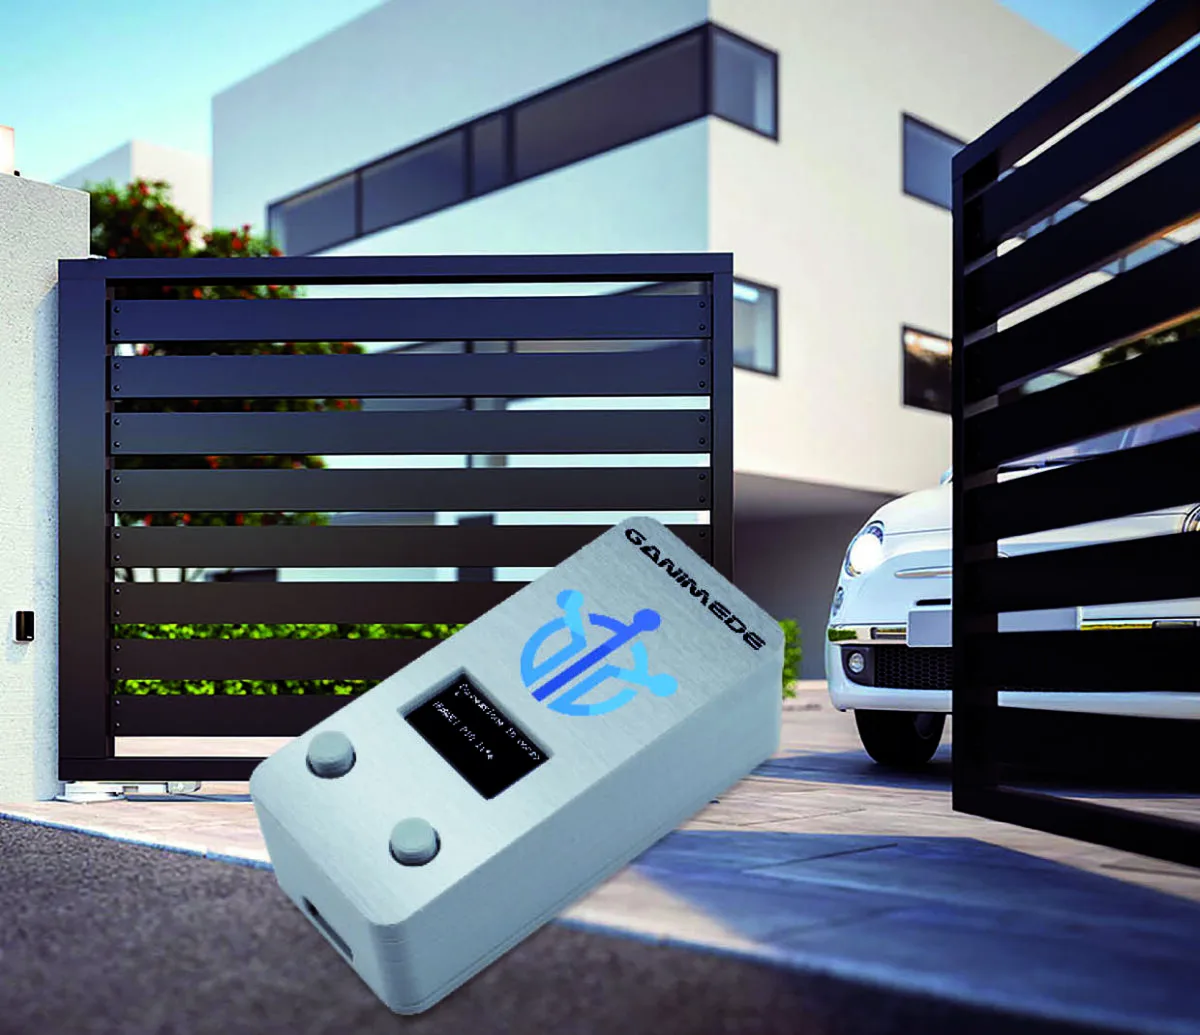
Thanks to the contribution of a Ganimede community enthusiast (Bruno Luziatelli, whom we thank), a 3D printable box was also developed, capable of containing Ganimede, the relay (code RELAY1CH) and the OLED display (code OLEDGVSCSD). The result (visible in Fig. 13) is a box equipped with mounting brackets and appropriate holes for wiring, which is very useful for use in real installations. Given the presence of holes for the display and various wiring, we still recommend using this box for indoor installations, or protected by appropriate enclosures with a degree of protection suitable for the application. The Step files for printing the case can be downloaded from the magazine’s website.
Conclusions
The project presented in this issue demonstrates how, through the use of Ganimede.E12 and the related MicroPython framework, it is possible to create a reliable and secure device in a very short time, even for those who are less experienced. We find thousands of devices capable of controlling relays remotely at a very low price, but very few offer a serverless architecture like the one described, and almost none are made using free, open source and secure services. The system described also allows the reader to draw inspiration to create other infinite devices that need to communicate with remote systems, using both dweet.io and the potential of Ganimede and MicroPython.