Arduino UNO Q: the dual-brain board that combines real-time control and artificial intelligence
Let’s explore the Arduino UNO Q, the dual-brain board that combines Linux and real-time control, bringing the “blink” into the AI era.
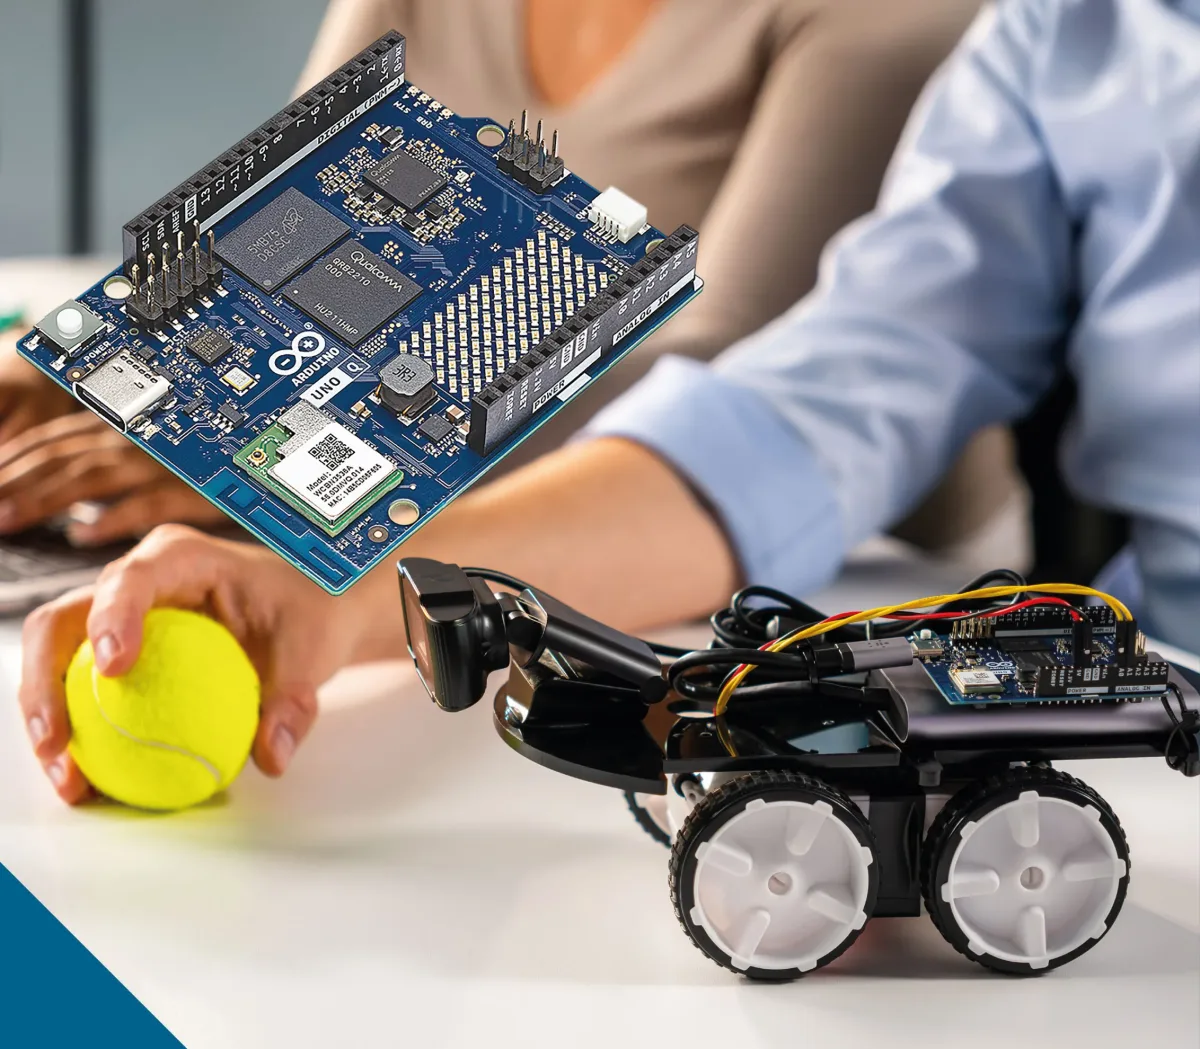
Twenty years after the first Arduino UNO, the maker community is experiencing the magic of innovation again with the Arduino UNO Q, a board that merges the open-source roots of the project with Qualcomm’s most advanced technologies. The announcement on October 7, 2025, coinciding with Qualcomm Technologies’ agreement to acquire Arduino, marks the beginning of a new era (Fig. 1).

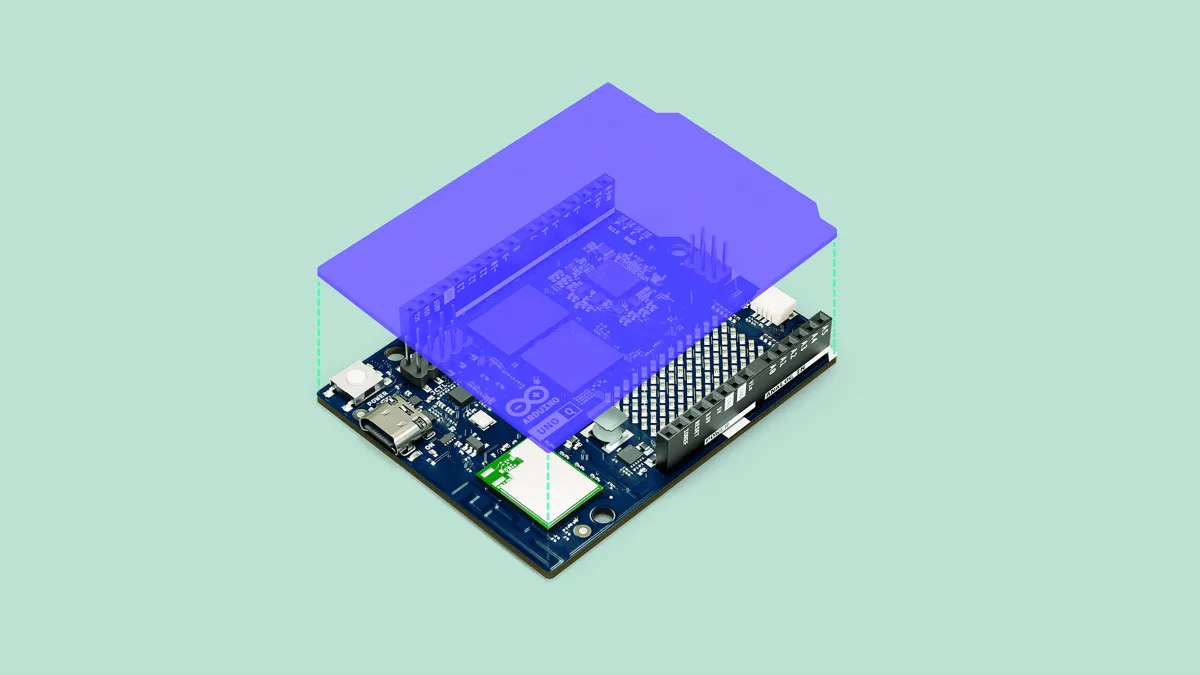
The first version of the UNO brought electronics within everyone’s reach, thanks to the “blink” example that made an LED flash. With the Arduino UNO Q, ambition grows: the motto ‘from blink to think’ captures the shift from a simple microcontroller to a hybrid platform capable of running Linux systems, processing artificial intelligence algorithms, and managing real-time control simultaneously. It’s a device designed for students, makers, researchers, and companies that want to move quickly from prototype to product using a single tool. The Arduino UNO Q is called “dual brain” because it integrates two distinct brains (Fig. 2).
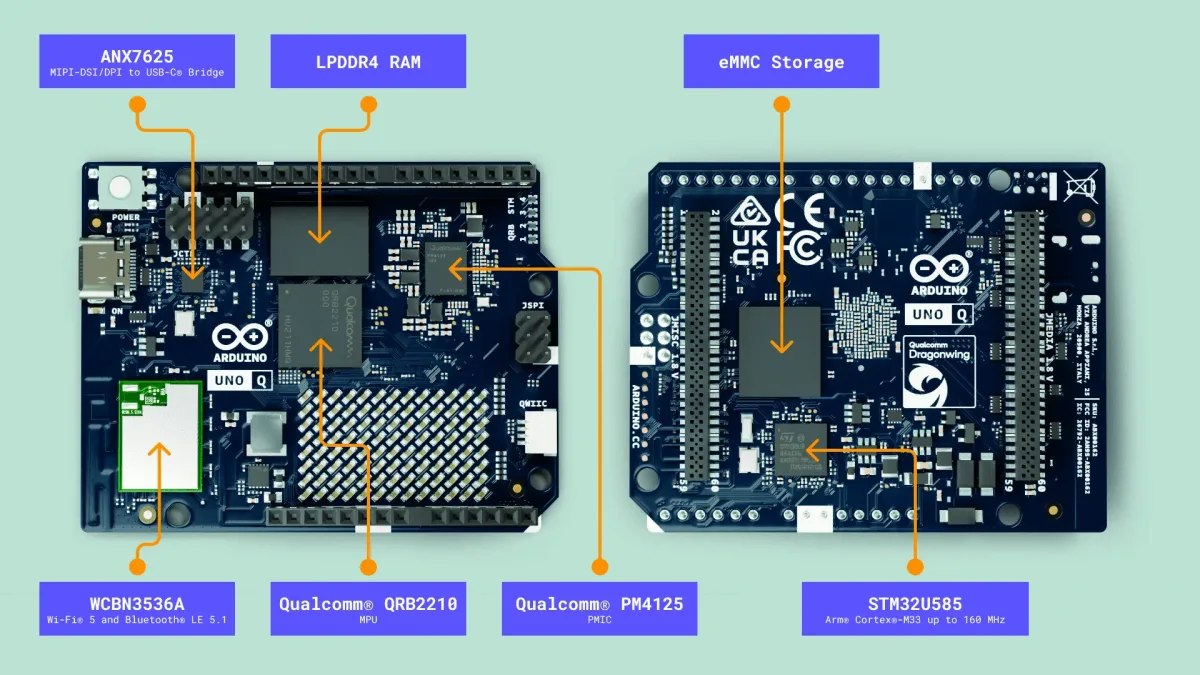
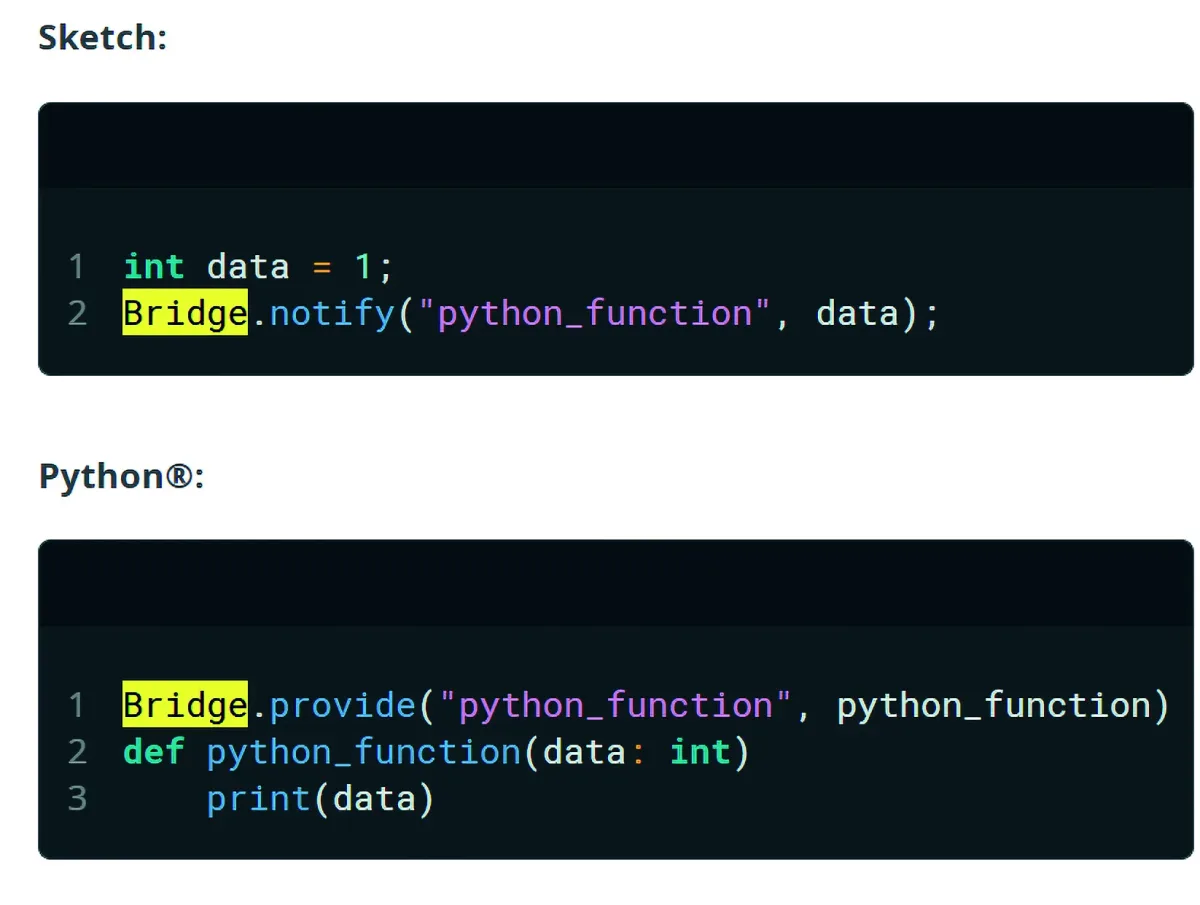
The first is the Qualcomm Dragonwing QRB2210, a quad-core Arm Cortex-A53 processor at 2 GHz with Adreno GPU and dual image signal processors (ISPs) that support video streams up to 25 MP at 30 fps. This microprocessor (MPU) runs a Debian Linux operating system with upstream support and can handle complex applications, 3D graphics, computer vision, and advanced user interfaces. The second brain is the STM32U585, an Arm Cortex-M33 microcontroller at 160 MHz with 2 MB of Flash and 786 KB of SRAM. The latter runs the Arduino Core based on Zephyr OS and provides the responsiveness needed for real-time control, sensor readings, and generation of PWM or CAN signals. The integration between Linux and the microcontroller is the result of a precise design choice: the Bridge library implements an RPC (Remote Procedure Call) layer that allows the two processors to communicate and share resources efficiently (Fig. 3). Thanks to this architecture, an Arduino sketch can delegate complex vision or network algorithms to the Linux system, while a Python application in Linux can access the microcontroller’s peripherals in real time. This synergy makes the board ideal for Edge AI projects, robotics, and connected devices. Additionally, the Arduino UNO Q maintains the classic Arduino UNO form factor (68.58 × 53.34 mm), ensuring full compatibility with millions of existing shields and accessories, thus offering a truly unique ecosystem (Fig. 4).
The 2025 presentation also highlighted the strong educational and community vision behind the project. Fabio Violante, CEO of Arduino, emphasized that joining the Qualcomm Technologies universe represents a natural evolution that will expand the platform’s possibilities without betraying its core values of openness, simplicity, and community spirit. The goal, he explained, is to strengthen the commitment to accessibility and innovation, offering increasingly powerful yet intuitive tools capable of making artificial intelligence accessible to everyone. Massimo Banzi added that this new phase renews Arduino’s original mission: spreading technological knowledge and enthusiasm for creation, with tools that combine power, ease of use, and freedom to experiment. The Arduino UNO Q perfectly embodies this vision, with a competitive price and technical features worthy of a mini-PC, but with the same immediacy that made the first Arduino famous.
Hardware
Dual architecture
The distinctive feature of the Arduino UNO Q is its dual architecture. The two processors are mounted on the same board and communicate via the Bridge library. The Qualcomm QRB2210 MPU runs Debian Linux and offers:
- Quad-core Arm Cortex-A53 CPU at 2 GHz with Adreno 702 GPU (845 MHz);
- dual ISPs that manage two video streams up to 13 MP or a 25 MP sensor, ideal for vision algorithms;
- USB 3.1 port with role switching and DisplayPort Alt Mode via the ANX7625 bridge, allowing monitors and USB peripherals to be connected simultaneously;
- support for MIPI-CSI-2 and MIPI-DSI via the JMEDIA connector, for high-speed cameras and displays.
The STM32U585 microcontroller provides:
- Arm Cortex-M33 core up to 160 MHz with 2 MB of Flash and 786 KB of SRAM;
- 3.3 V GPIO with support for SPI, I²C, UART, PWM, and CAN on the JDIGITAL and JANALOG connectors;
- management of the 8 × 13 LED matrix (104 pixels), CAN bus, PWM, and timers;
- two RGB LEDs controlled by the microcontroller, alongside two others controlled by the MPU.
Memory and variants
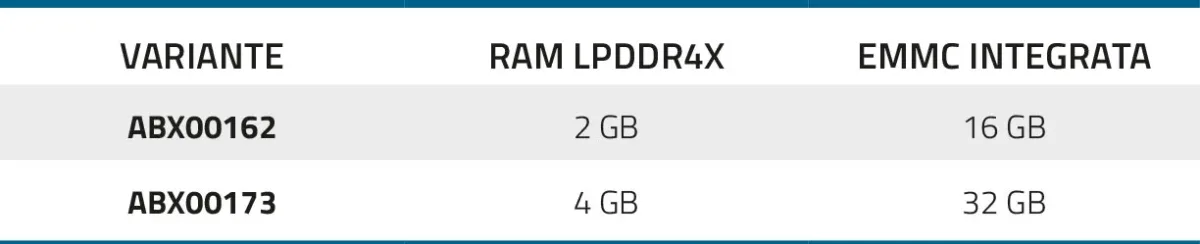
The Arduino UNO Q is offered in two versions:
- 2 GB of RAM and 16 GB eMMC
- 4 GB of RAM and 32 GB eMMC
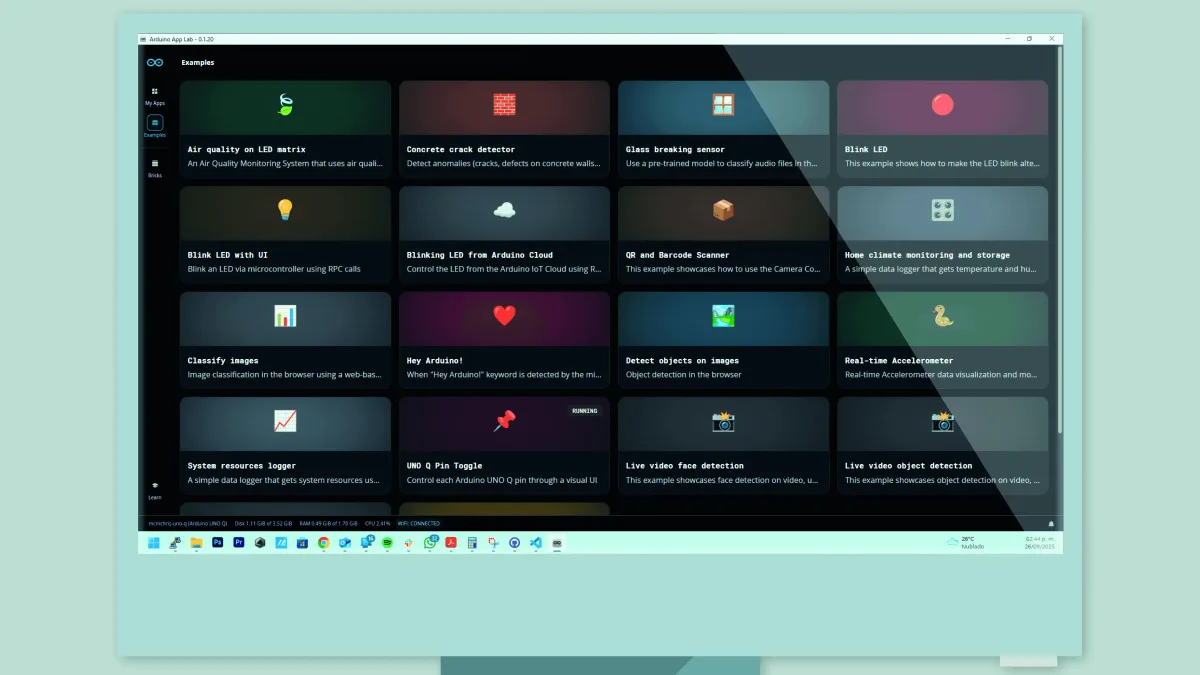
The LPDDR4X memory and integrated eMMC allow Linux and applications to run without external SD cards, ensuring a compact and reliable system. The versions with 4 GB of RAM and 32 GB of eMMC offer a true single-board computer experience, ideal for using Arduino App Lab (Fig. 5) in standalone mode and for managing complex projects that require more space and fluidity. Even the variant with 2 GB of RAM and 16 GB of eMMC is perfectly capable of functioning as an SBC, but it is better suited for light development, prototypes, or educational use, where the resources required by the operating system and applications are not excessive. In more demanding projects, the performance difference is especially noticeable in app loading speed and simultaneous management of multiple processes.
Connectivity and peripherals
The Arduino UNO Q offers a rich set of connectors, expansion buses, and digital interfaces, divided between the top and bottom sides of the board. This allows you to connect displays, sensors, cameras, audio peripherals, I²C, SPI, or CAN devices, and of course classic UNO shields, while maintaining full mechanical compatibility with the extensive Arduino hardware and software ecosystem, ideal for prototypes, experiments, and advanced applications.
Top side
The top side of the board hosts most of the expansion connectors and headers compatible with the Arduino UNO form factor, including digital, analog, and power pins (Fig. 6).
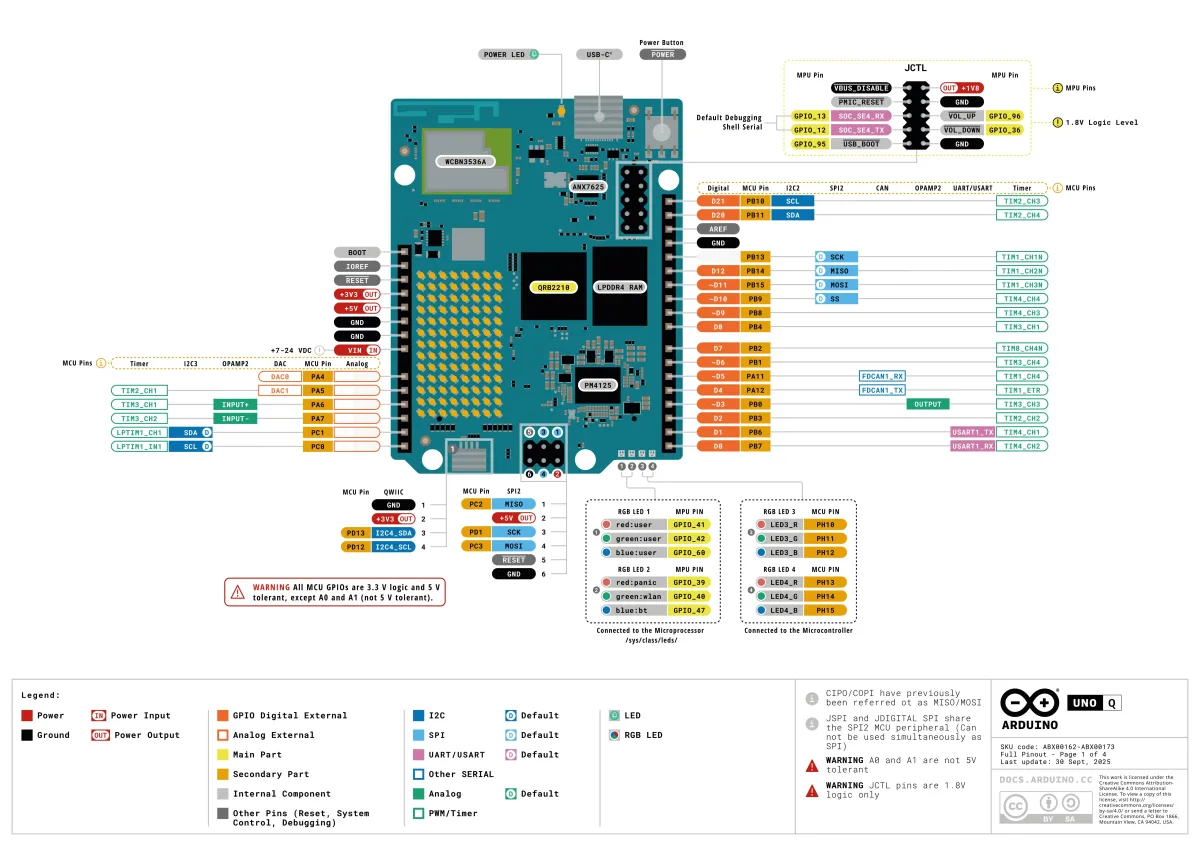
JDIGITAL (18 pins, 3.3 V):
- Compatible with standard Arduino UNO digital pins D0–D13.
- Exposes GPIO managed by the microcontroller.
- Supports functions such as: SPI2, UART1, CAN2, PWM, general GPIO.
- Pins are 5 V tolerant as inputs but output 3.3 V signals.
JANALOG (14 pins, 3.3 V):
- Compatible with Arduino UNO pins A0–A5.
- Includes analog inputs, DAC, OPAMP, SPI3, I²C3, differential inputs.
- Pins A0 and A1 are not 5 V tolerant: maximum voltage is 3.3 V.
JSPI (6 pins, 3.3 V logic):
- Dedicated SPI header: MOSI, MISO, SCK, Reset, GND, +5 V.
- Compatible with shields that require a central SPI connection.
- Lines are shared with SPI2 on JDIGITAL but cannot be used simultaneously as separate buses.
Arduino UNO compatible headers:
- Identical layout to the classic UNO for power, GND, IOREF, AREF, Reset.
- Power on VIN, 5V, 3V3, GND pins, with full electrical compatibility.
- This ensures mechanical backward compatibility with most shields.
Qwiic connector (3.3 V):
- Allows direct connection of compatible I²C modules (Modulino, SparkFun sensors) without soldering.
- Uses the I²C2 bus shared with the microcontroller’s SDA/SCL pins.
Multifunction USB-C connector:
- 5 V / 3 A power with Power Delivery negotiation.
- Support for Role Switching and DisplayPort Alt Mode (via ANX7625).
- USB 3.1 data transfer, video, and power through a single cable.
Indicators and user interface:
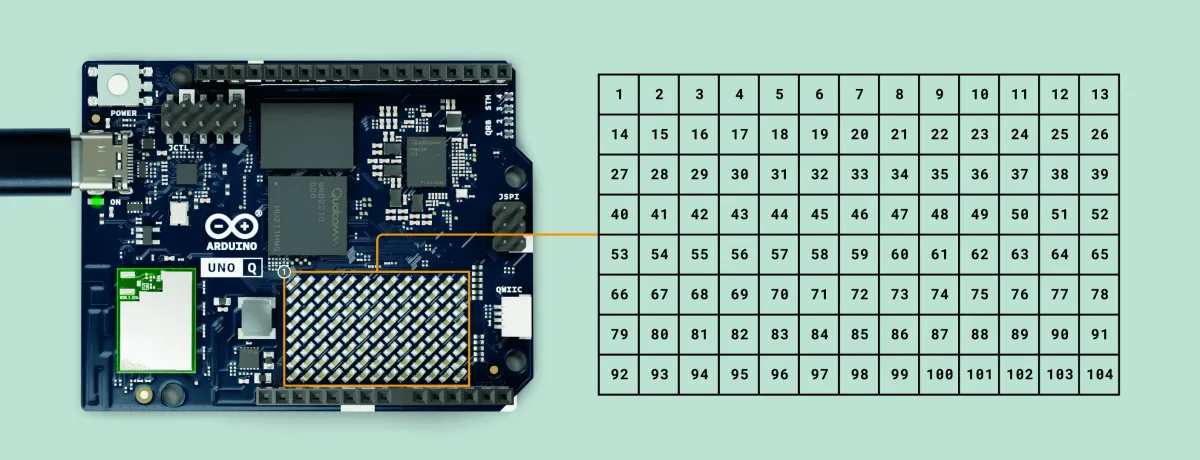
- Programmable 8×13 LED matrix (104 pixels).
- 4 RGB LEDs: two controlled by the MPU, two by the MCU.
- Power status LED (green).
- Power button for power-on and reset.
Bottom side
The bottom side hosts high-density connectors and advanced signals, mainly dedicated to multimedia peripherals, audio, industrial interfaces, and debugging (Fig. 7).
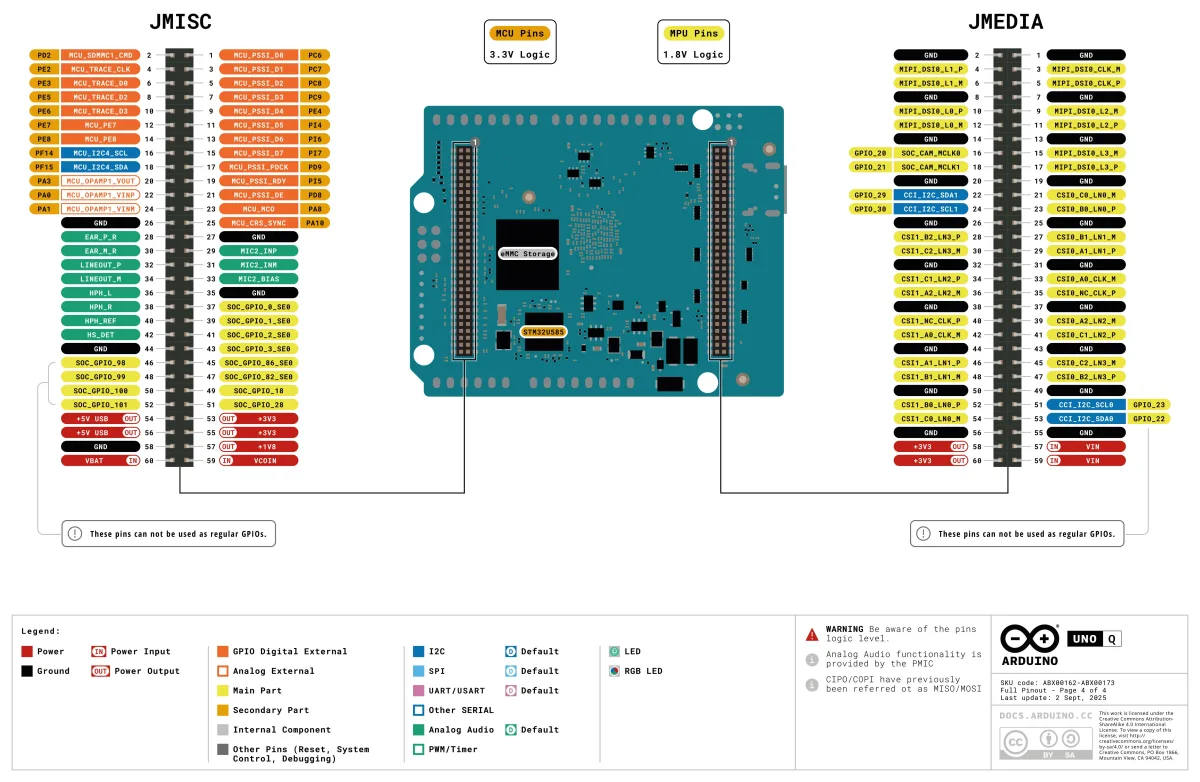
JMEDIA (60 pins, 1.8 V):
- High-speed video and sensor connector.
- Supports: MIPI-CSI-2 for dual cameras or up to 25 MP.
- MIPI-DSI for high-resolution displays.
- Clock and dual CCI (I²C) bus for sensor configuration.
- 1.8 V and 3.3 V power supplies for external devices.
JMISC (60 pins, mixed 1.8 V / 3.3 V):
- Multifunction port for special signals and audio.
- Includes: SDMMC1 for SD card support or secondary storage.
- PSSI (Parallel Serial Streaming Interface) for high-speed video or data transmission.
TRACE for advanced debugging via CoreSight.
I²C4 (alternative to the ones exposed above).
Analog audio interfaces: microphone in, line in, headphone out.
Additional GPIO lines at 1.8 V / 3.3 V.
Power rails at 5 V, 3.3 V, 1.8 V for external peripherals.
JCTL (10-pin, 1.8 V)
Control and debug port.
Exposes: SE4 UART (serial console for system shell).
Boot mode, wake, reset.
GPIO dedicated to boot and flashing management.
Note: all signals operate at 1.8 V.
This modular organization lets Arduino UNO Q meet the needs of prototyping, embedded development, artificial intelligence, robotics, and advanced multimedia.
Power management
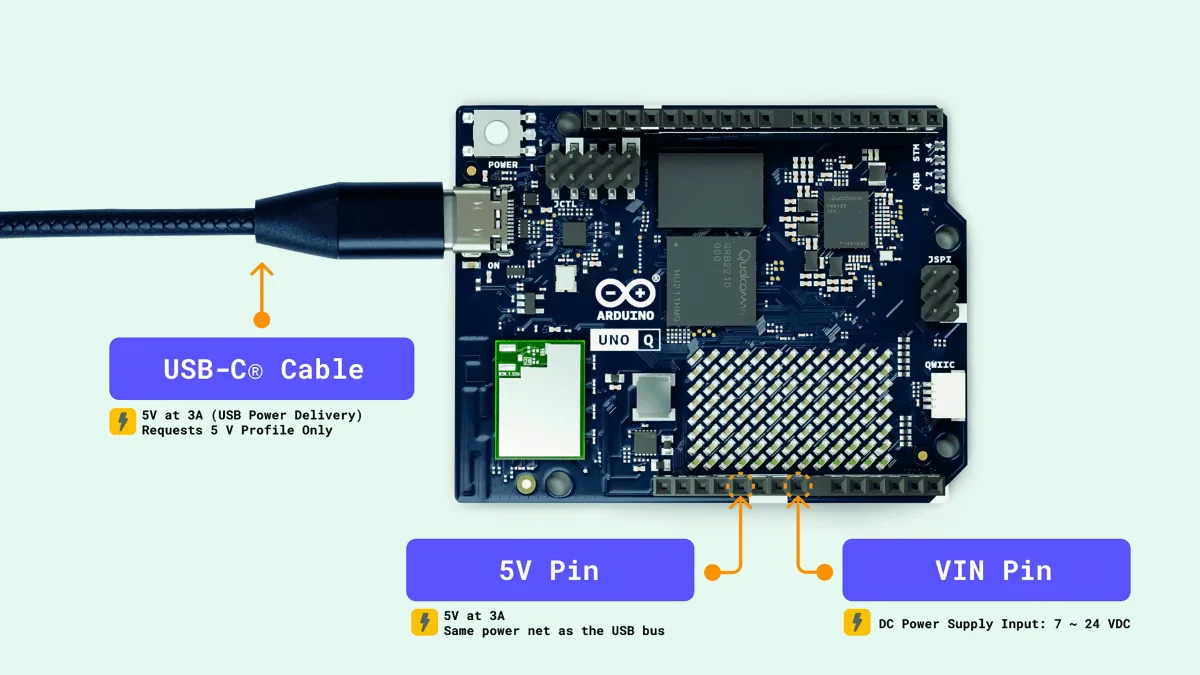
Arduino UNO Q supports two power inputs: USB-C and VIN (Fig. 8). The USB-C VBUS connector accepts 5 V and negotiates a 5 V/3 A contract via USB Power Delivery, without requiring higher-voltage profiles. The VIN pin (DC IN) accepts voltages between 7 and 24 V and powers the board through a step-down converter. Both sources are combined via a diode-OR on the 5V_SYS system bus. From this node, the 3.8 V, 3.3 V, and 1.8 V rails are generated using buck converters and LDOs. The power management IC (PMIC PM4125) uses 5V_SYS to generate the 1.8 V rail, needed for the SoC lines and level shifters. The recommended specifications call for a 5 V/3 A power supply to avoid voltage drops during consumption peaks, for example when the WiFi or display draws power. The recommended range for the 3.3 V rail is 3.1 to 3.5 V, while the operating temperature ranges from −10 °C to +60 °C. When using VIN at 7–24 V, a power supply that can guarantee the required current at 5 V and short cables to minimize voltage drops is advisable.
User interface and indicators
Arduino UNO Q features an immediate user interface. The blue 8 × 13 LED matrix (104 pixels) displays the logo during boot for about 20–30 seconds and can be programmed via firmware (Fig. 9). The four RGB LEDs allow creating light feedback; two are controlled by the Linux system and two by the microcontroller. The green power LED signals when the board is powered.
Software: Arduino App Lab
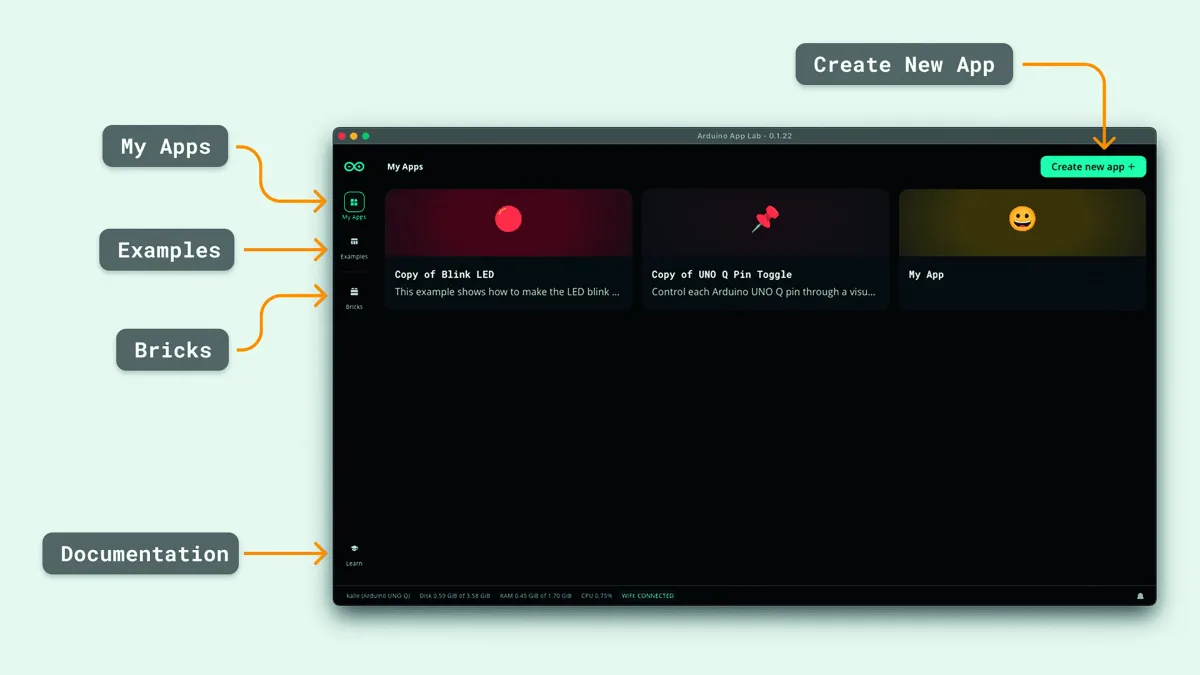
Arduino UNO Q is the first board to support Arduino App Lab, an integrated development environment (IDE) that brings together in a single platform the programming of Arduino sketches, Python scripts, and Linux applications isolated in containers. According to the official documentation, App Lab allows combining Arduino code, Python, and AI models enclosed in dedicated environments, managed by a single interface (Fig. 10). The platform, already installed on the board, offers:
- Unified development experience: from a single window you can write programs for the microcontroller, Python scripts for the Linux system, and orchestrate Docker containers;
- Arduino Apps and Bricks: complete examples and plug-and-play blocks that speed up prototyping; Bricks let you add features, such as image recognition or anomaly detection, without writing complex code;
- Preloaded AI models: App Lab includes AI models for object detection, person detection, image classification, anomaly detection, and keyword spotting. In addition, integration with the Edge Impulse platform allows training and fine-tuning models;
- Compatibility with Arduino IDE and cloud: despite App Lab offering a new workflow, the Arduino IDE 2.x remains available for programming only the microcontroller, and Arduino Cloud support enables remote management.
The App Lab IDE can run directly on the board (single-board computer mode) or on the user’s computer (PC mode). The desktop version is downloadable for Windows 10+, macOS 11+, and Linux (Ubuntu 22.04 or Debian Trixie), while the onboard version is preinstalled.
Hybrid development
The workflow on Arduino UNO Q is designed to leverage both sides of the board. A developer can, for example, write a sketch that reads a sensor on the microcontroller and sends the data to the Linux side via Bridge. In Linux, a Python script or a container can process the data using libraries like OpenCV or TensorFlow Lite. The result (for example, gesture recognition) can be sent back to the microcontroller, which drives motors or LEDs. The Arduino App Lab environment simplifies this process by orchestrating the compilation, upload, and execution of the various components. Users who prefer a traditional approach can continue using Arduino IDE 2 to program the MCU section. Existing Arduino libraries are fully compatible, and the community is already adapting shields and projects to the new hardware. For Linux applications, the presence of Debian with upstream support allows using apt to install packages, configure network services, run web servers or databases, and create complete IoT and edge computing solutions.
Updates and advanced access
One of Arduino UNO Q’s strengths is its open structure, fully manageable even at the system level. The Debian Linux operating system is preinstalled and receives automatic over-the-air updates, but for more advanced users an official procedure is also available to restore or completely reinstall the system image. This operation allows returning the board to its initial state or installing an updated version of the system, using a simple command-line tool. It is a feature designed especially for those who want to experiment deeply or keep their environment always perfectly clean and up to date. Similarly, Arduino UNO Q allows accessing the operating system via SSH (Secure Shell), activated automatically during initial setup. This makes it possible to enter the board’s Linux shell to install packages, copy files, or manage services from the terminal, just like on a normal computer. All steps – from initial configuration to remote connection – are clearly illustrated in the official documentation, which guides the user step by step. In this way, Arduino stays true to its philosophy: offering a powerful and versatile device, simple for those who want to get started, but deep and fully controllable for those who want to go beyond basic programming.
Usage: SBC and PC-hosted modes
Single-board computer (SBC) configuration
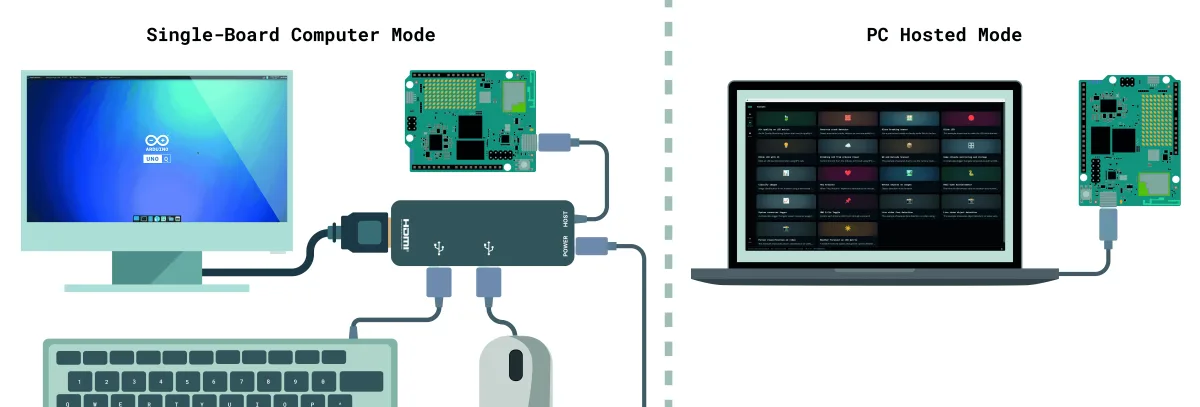
Arduino UNO Q can become a true single-board computer by connecting a monitor, keyboard, and mouse (Fig. 11, left). Thanks to the USB-C port with Role Switching and DisplayPort Alt Mode, the board can provide power, video output, and data simultaneously. To set it up you need:
- Arduino UNO Q;
- USB-C cable;
- Multi-port USB-C dongle or hub with external power and ports for HDMI/DisplayPort, keyboard, and mouse. Apple dongles are best avoided because they do not handle power negotiation correctly;
- An external 5 V / 3 A power supply connected to the dongle’s port.
After connecting the dongle, the board automatically detects the monitor, keyboard, and mouse, and boots Debian Linux. The App Lab graphical interface runs locally, allowing you to program directly on the board. You can open a browser, install packages with apt, run Python scripts, and interact with the microcontroller sketch through Bridge. The experience is similar to that of a mini PC, and for this reason the tutorial suggests the 4 GB RAM variant for optimal performance. If you prefer to keep the hardware minimalist, Arduino UNO Q can be controlled over the network using Network Mode. App Lab on the PC detects the board on the local network and connects remotely, making a physical monitor optional. This mode allows developing and testing applications in parallel and is convenient for teaching labs and shared environments.
PC-hosted mode
When you don’t have a monitor available, or you want to take advantage of the processing power of a more capable computer, you can use PC-hosted mode (Fig. 11, right). In this case, the Arduino UNO Q connects to the PC via a simple USB-C cable and App Lab runs directly on the computer.
The board behaves as a remote target: it runs sketches, Python scripts, and containers, while the user interface and source files reside on the user’s machine. This mode helps reduce hardware costs — no multi-port hub is needed — and offers the benefit of a full-screen editor.
Thanks to the USB-C connection, you can also expose both the serial port for the Arduino console and the JTAG debug port (via JCTL).
System maintenance and updates
To keep the system up to date, Arduino recommends running updates regularly through App Lab or apt in Debian. If persistent issues occur, you can use the flashing procedure described in the Software section. Additionally, you can monitor power consumption and temperatures through the built-in sensors exposed by the Linux kernel, and set up scripts for safe shutdown in case of overheating.
Application examples and use cases
Combining a Linux processor with GPU and a real-time microcontroller opens up completely new scenarios for the UNO platform. Applications suggested in the datasheet include rapid prototyping of vision tools, smart kiosks, autonomous robots, educational devices, home automation, and games. Here are some examples:
- Edge AI and machine vision: thanks to the ISP and integrated GPU, the Arduino UNO Q can run image classification models, person detection, or real-time motion analysis. Data can be processed in Python or via containers with TensorFlow Lite, while the microcontroller controls external hardware.
- Robotics and automation: the 3.3 V GPIO lines and the CAN bus allow connecting motor drivers, position sensors, and actuators. Bridge communication lets the Linux processor handle navigation algorithms while the microcontroller performs low-latency control.
- Consumer and IoT devices: analog audio, DisplayPort, and high-speed connections make it possible to build smart speakers with voice recognition, home cameras with facial recognition, or smart thermostats with a graphical interface.
- Education and STEM: the Arduino UNO Q is a portable laboratory for teaching Linux, C/C++ and Python programming, robotics, artificial intelligence, and wireless communications. The App Lab IDE and built-in examples reduce the learning curve and let you quickly build tangible projects.
Conclusions
The Arduino UNO Q represents a turning point in the landscape of educational and prototyping boards. With a design that combines a quad-core processor capable of running Debian Linux and a high-performance microcontroller, the board offers computing power, real-time control, and artificial intelligence in a single device.
The hardware features — memory, WiFi 5 and Bluetooth 5.1, DisplayPort video output, headers compatible with UNO shields, LED matrix, and Qwiic connector — make it a versatile platform. On the software side, Arduino App Lab introduces a unified development paradigm that lets you combine sketches, Python, and AI containers seamlessly. The board is designed to work both as a standalone single-board computer, connected to a monitor and keyboard, and as a module to connect to a PC for convenience. Users can update the operating system through an official flasher, knowing that the Debian OS is regularly maintained.
The ability to access via SSH and control the microcontroller with the traditional IDE ensures flexibility for all experience levels. Ultimately, the Arduino UNO Q brings the spirit of Arduino into the future: a device that doesn’t just blink an LED, but thinks, learns, and interacts with the world. For those looking for a platform that combines the simplicity and openness of the Arduino ecosystem with the power of modern computing, the Arduino UNO Q is the natural evolution.